日新又日新 (일신우일신)
"진실로 새로워지기 위해서는, 날마다 새로워야 하고 또 새로워야 한다"
안녕, 이크테크 ~ 이제 부터 다시 시작이다. 🌈
1. Quantum Resistant WireGuard-Go
Linux용 wireguard는 처음부터 kernel 기반으로 개발되었기 때문에, 사용자 영역에서 동작하는 방식인 wireguard-go 코드가 상대적으로 덜 중요한 것으로 인식되어 온 것이 사실이다. 그도 그럴 것이 Wireguard 핵심 개발자(창시자)인 Jason A. Donenfeld는 wireguard-go code 안에 (linux의 경우는) kernel version을 사용할 것을 권고하는 경고 문구를 넣어 두기까지 하였으니, 두말하면 잔소리인 셈이다. 필자의 경우도 이제껏 wireguard kernel code만을 주요 대상으로 삼았을 뿐, wireguard-go code에는 그다지 관심을 두지 않았던 것도 사실이다. 😓
하지만, 최근들어 wireguard-go가 kernel version에 비해 우수한 성능(10GbE 환경에서의 throughput)을 낼 수 있다는 사실이 알려지면서, wireguard-go 버젼의 가능성(필요성)이 다시 재조명되기 시작하고 있다(최소한 필자에게는 😎). 따라서 이번 post에서는 오로지 wireguard-go 코드만을 대상으로 내용 전개를 이어가 보고자 한다.
<여기서 잠깐 ! - wireguard-go를 이용하여 10GbE 환경에서의 성능 개선에 관하여>
------------------------------------------------------------------------------------------------------------
Kernel version의 wireguard 사용 시, 1GbE 환경에서는 거의 wire speed에 육박하는 성능치를 보여주지만, 10GbE 환경에서 1-2Gbps 정도의 throughput 밖에 나오지 않는 심각한 문제가 있다.
# iperf3 -c 10.10.1.2 -b 10G -w 4096K
[그림 1.1] 10GbE 환경에서의 kernel wireguard udp 성능 측정 결과
아래 link는 tailscale사 엔지니어가 wireguard-go를 이용해서 10GbE 환경에서 성능을 끌어올린 아주 흥미로운 내용을 소개하고 있다. 내용이 조금은 어려울 수도 있으니, 읽기전 마음의 준비를 하기 바란다. 😕
[그림 1.2] 10GbE 환경에서의 kernel wireguard vs wireguard-go의 tcp 성능 비교[출처: 참고문헌 8]
[그림 1.3] 25GbE 지원하는 NIC 사용 시, kernel wireguard vs wireguard-go의 tcp 성능 비교[출처: 참고문헌 8]
------------------------------------------------------------------------------------------------------------
a) WireGuard-Go의 구조(패킷 흐름)
우선 아래 site에서 wireguard-go code를 download 받아 build해 보도록 하자.
<How to download and build the wireguard-go>
$ git clone https://git.zx2c4.com/wireguard-go
$ cd wireguard-go
$ make
외관상으로 볼 때, wireguard-go는 tun device를 사용하는 여타의 vpn s/w의 구조와 크게 다를 바가 없다. 물론 깊숙히 들여다 보면, 코드의 난이도가 매우 높으며, 상당히 수준 높은 코드로 구성되어 있음을 금방 알게 된다. 😍
[그림 1.4] WireGuard-Go 패킷 처리 구조(1) - tun0/eth0 간의 packet proxy 역할
[그림 1.5] WireGuard-Go 패킷 처리 구조(2) [출처: 참고문헌 7]
[그림 1.6] WireGuard-Go 패킷 처리 구조(3) - 2개의 NanoPi 간 통신
자, 그럼 지금부터 간략하게 나마 wireguard-go code를 파헤쳐(?) 보도록 하자.
<wireguard-go main routine에서 하는 일>
----> wireguard-go/main.go
a) tun device 생성
=> tun device open, tun device read 함수 정의, tun 관련 event 처리 routine 정의
b) wireguard device 생성
=> 3개의 queue(handshaking, encryption, decryption) 생성, 3개의 go routine(handshaking, encryption, decryption worker) 호출
c) UAPI 처리 코드
=> wg tool을 통해 내려주는 설정을 받아주는 코드(unix domain socket 코드)
d) 기타 daemon화 및 로그 초기화 등 진행
wireguard-go는 위의 b) 단계에서 wireguard device(예: wg0)를 생성하면서 아래와 같이 3개의 queue(go 채널)를 만드는데, 이 3개의 queue는 이어서 설명하는 패킷 처리 routine과 자연스럽게 연결된다.
- device.queue.handshake = newHandshakeQueue() //handshaking message용 queue
- device.queue.encryption = newOutboundQueue() //encryption을 하기 전에 대기하는 queue
- device.queue.decryption = newInboundQueue() //decryption을 하기 전에 대기하는 queue
<wireguard-go code의 패킷 처리>
a) device.RoutineHandshake( ) : peer와의 tunnel을 형성하기 위한 noise handshaking 과정
b) device.RoutineEncryption( ) : tun device로 부터 패킷 수신 후, tunneling 처리. 이어서 tunnel 처리된 패킷을 eth0 device로 전송하는 과정 (주의: 실제로 이 함수는 암호화 및 tunnel 처리만 담당)
c) device.RoutineDecryption( ) : eth0 device로 부터 tunnel packet 수신 후, tunnel 제거. 이어서 tunnel 제거된 패킷을 tun device로 전송하는 과정 (주의: 실제로 이 함수는 터널 제거 및 복호화 처리만 담당)
wireguard-go code에는 중요한 파일들이 많이 있으나, 위에서 설명한 내용으로 국한시켜 정리해 보면 다음과 같은 파일들이 눈에 들어온다.
<wireguard-go 주요 패킷 흐름과 연관된 파일>
- main.go
- tun/tun_linux.go
- device/device.go, send.go, receive.go, noise-protocol.go, peer.go
- ipc/uapi_linux.go
wireguard-go의 대략적인 코드 흐름(혹은 패킷 flow)을 살펴 보았으니, 이제 부터는 wireguard-go code에 pqc code를 통합시켜 보도록 하자.
📌 당초 계획은 wireguard-go code를 아주 면밀히 분석/정리하는 것이었으나, 생각처럼 쉽지가 않다. 😔
b) PQ-WireGuard 프로토콜 review
PQ-WireGuard 프로토콜과 관련해서는 이미 이전 blog(5절)를 통해서 상세히 소개한 바 있다. 따라서 PQ-WireGuard 관련 자세한 사항은 아래 link를 참조하기 바란다.
[그림 1.7] WireGuard vs PQ-WireGuard
[그림 1.8] PQ-WireGuard 프로토콜 요약 - Noise IK + Kyber KEM
c) wireguard-go에 PQC 적용하기
이전 blog에서는 wireguard kernel code에 PQC(Kyber768) 알고리즘을 적용해 보았다면, 이번 시간에는 wireguard-go code에 kyber1024를 적용하는 방법(kyber768 적용과 동일)을 소개해 보고자 한다.
Go언어로 구현된 Kyber code는 여러가지가 있지만, 본 blog에서는 아래 code를 사용하는 것으로 하였다.
먼저, Kyber-k2so 코드의 간단한 사용 방법을 정리해 보면 다음과 같다.
==================================================================
go get -u github.com/symbolicsoft/kyber-k2so
package main

import (
	kyberk2so "github.com/symbolicsoft/kyber-k2so"
)

func main() {
	privateKey, publicKey, _ := kyberk2so.KemKeypair768()
	ciphertext, ssA, _ := kyberk2so.KemEncrypt768(publicKey)
	ssB, _ := kyberk2so.KemDecrypt768(ciphertext, privateKey)
}
==================================================================
자, 그럼 본격적으로 kyber1024 code를 noise protocol에 추가해 보도록 하자. 작업할 내용이 많을 것 같지만, 수정이 필요한 파일은 오직 하나 즉, wireguard-go/device/noise-protocol.go 파일 뿐이다.
<noise-protocol.go 파일 수정 절차>
단계#1> kyberk2so package import 하기
import kyberk2so "github.com/symbolicsoft/kyber-k2so"
단계#2> Packet size 설정 값 변경하기
const (
MessageInitiationSize = (148 + kyberk2so.Kyber1024PKBytes) // size of handshake initiation message
MessageResponseSize = (92 + kyberk2so.Kyber1024CTBytes) // size of response message
MessageCookieReplySize = 64 // size of cookie reply message
MessageTransportHeaderSize = 16 // size of data preceding content in transport message
MessageTransportSize = MessageTransportHeaderSize + poly1305.TagSize // size of empty transport
MessageKeepaliveSize = MessageTransportSize // size of keepalive
MessageHandshakeSize = MessageInitiationSize // size of largest handshake related message
)
단계#3> Initiation Message 수정하기
type MessageInitiation struct {
Type uint32
Sender uint32
Ephemeral NoisePublicKey
Static [NoisePublicKeySize + poly1305.TagSize]byte
Timestamp [tai64n.TimestampSize + poly1305.TagSize]byte
PqcPublickey [kyberk2so.Kyber1024PKBytes]byte
MAC1 [blake2s.Size128]byte
MAC2 [blake2s.Size128]byte
}
📌 PqcPublickey의 첫글자는 반드시 대문자이어야 한다. 그 이유는 다른 package code에서 이 필드를 참조하기 때문이다. 소문자로 할 경우, panic error가 발생하므로 주의를 요한다.
단계#4> Response Message 수정하기
type MessageResponse struct {
Type uint32
Sender uint32
Receiver uint32
Ephemeral NoisePublicKey
Empty [poly1305.TagSize]byte
PqcCiphertext [kyberk2so.Kyber1024CTBytes]byte
MAC1 [blake2s.Size128]byte
MAC2 [blake2s.Size128]byte
}
단계#5> Noise Protocol 코드 수정하기
Noise protocol에 kyber1024 code를 추가하는 것은 어렵지 않다. 먼저 위의 그림 1.8을 자세히 살펴보고, 그에 맞게 적절히 작업해 주기만 하면 된다.
<kyber1024 keypair 생성 단계>
func (device *Device) CreateMessageInitiation(peer *Peer) (*MessageInitiation, error) {
...
var pqcerr error
handshake.pqcKem.pqcSK, handshake.pqcKem.pqcPK, pqcerr = kyberk2so.KemKeypair1024()
if pqcerr == nil {
msg.PqcPublickey = handshake.pqcKem.pqcPK
} else {
fmt.Printf("kyberk2so.KemKeypair1024() failed.\n")
}
...
}
<kyber1024 encapsulation 단계>
func (device *Device) ConsumeMessageInitiation(msg *MessageInitiation) *Peer {
...
var pqcerr error
handshake.pqcCiphertext, handshake.presharedKey, pqcerr = kyberk2so.KemEncrypt1024(msg.PqcPublickey)
if pqcerr != nil {
fmt.Printf("kyberk2so.KemEncrypt1024() failed.\n")
}
...
}
<kyber1024 ciphertext 복사 단계>
func (device *Device) CreateMessageResponse(peer *Peer) (*MessageResponse, error) {
...
msg.PqcCiphertext = handshake.pqcCiphertext
...
}
<kyber1024 decapsulation 단계>
func (device *Device) ConsumeMessageResponse(msg *MessageResponse) *Peer {
...
var pqcerr error
handshake.presharedKey, pqcerr = kyberk2so.KemDecrypt1024(msg.PqcCiphertext, handshake.pqcKem.pqcSK)
if pqcerr != nil {
fmt.Printf("kyberk2so.KemDecrypt1024() failed.\n")
}
...
}
위의 내용이 적용된 코드는 아래 위치에서 확인 가능하다. 😋
<여기서 잠깐 ! - Rosenpass 프로토콜에 관하여>
==============================================================
[그림 1.10] Rosenpass Key Exchange Protocol
[그림 1.11] Rosenpass Message Types
Rosenpass는 userspace daemon형태로 구현되어 있으며, 아래 그림과 같은 방식으로 wireguard(kernel)와 통신한다.
[그림 1.12] Rosenpass + WireGuard
Rosenpass는 Rust로 구현되어 있다. 먼저 Build만 간단히 진행해 보면 다음과 같다.
<Ubuntu 22.04>
$ git clone https://github.com/rosenpass/rosenpass
$ cd rosenpass
$ ls -aF
./ .github/ LICENSE-APACHE config-examples/ fuzz/ rp/
../ .gitignore LICENSE-MIT constant-time/ marzipan/ secret-memory/
.ci/ .gitlab-ci.yml analysis/ doc/ oqs/ to/
.devcontainer/ .prettierignore analyze.sh* flake.lock papers/ util/
.envrc Cargo.lock cipher-traits/ flake.nix readme.md
.git/ Cargo.toml ciphers/ format_rust_code.sh* rosenpass/
chyi@earth:/mnt/hdd/workspace/download/rosenpass$ vi readme.md
$ cargo build
Updating crates.io index
Downloaded adler v1.0.2
Downloaded anstyle-parse v0.2.2
Downloaded anstyle-query v1.0.0
Downloaded anstyle v1.0.4
Downloaded addr2line v0.21.0
Downloaded allocator-api2 v0.2.18
Downloaded anyhow v1.0.82
Downloaded aead v0.5.2
Downloaded block-buffer v0.10.4
Downloaded anstream v0.6.13
Downloaded bitflags v2.4.1
Downloaded aho-corasick v1.1.2
Downloaded byteorder v1.5.0
Downloaded blake2 v0.10.6
Downloaded autocfg v1.1.0
Downloaded pin-utils v0.1.0
Downloaded clang-sys v1.6.1
Downloaded cexpr v0.6.0
Downloaded clap_derive v4.5.4
Downloaded bitflags v1.3.2
Downloaded clap v4.5.4
Downloaded chacha20 v0.9.1
Downloaded bytes v1.6.0
Downloaded base64 v0.21.7
Downloaded equivalent v1.0.1
Downloaded colorchoice v1.0.0
Downloaded memsec v0.6.3
Downloaded cfg-if v1.0.0
Downloaded cmake v0.1.50
Downloaded futures-macro v0.3.30
Downloaded fnv v1.0.7
Downloaded cpufeatures v0.2.12
Downloaded clap_lex v0.7.0
Downloaded digest v0.10.7
Downloaded cipher v0.4.4
Downloaded num_cpus v1.16.0
...
$ cd target/debug
$ ls -la
합계 129948
drwxrwxr-x 7 chyi chyi 4096 4월 26 15:09 .
drwxrwxr-x 3 chyi chyi 4096 4월 26 15:09 ..
-rw-rw-r-- 1 chyi chyi 0 4월 26 15:09 .cargo-lock
drwxrwxr-x 228 chyi chyi 16384 4월 26 15:09 .fingerprint
drwxrwxr-x 50 chyi chyi 4096 4월 26 15:09 build
drwxrwxr-x 2 chyi chyi 65536 4월 26 15:09 deps
drwxrwxr-x 2 chyi chyi 4096 4월 26 15:09 examples
drwxrwxr-x 13 chyi chyi 4096 4월 26 15:09 incremental
-rw-rw-r-- 1 chyi chyi 3404 4월 26 15:09 librosenpass.d
-rw-rw-r-- 2 chyi chyi 17500318 4월 26 15:09 librosenpass.rlib
-rwxrwxr-x 2 chyi chyi 52229312 4월 26 15:09 rosenpass
-rw-rw-r-- 1 chyi chyi 3456 4월 26 15:09 rosenpass.d
-rwxrwxr-x 2 chyi chyi 63215256 4월 26 15:09 rp
-rw-rw-r-- 1 chyi chyi 3603 4월 26 15:09 rp.d
실제로 rosenpass daemon과 wireguard kernel을 연동하는 시험은 독자 여러분의 몫으로 남긴다. 😓
그런데, rosenpass를 GoLang으로 porting한 것은 없을까 ? 아래 site에 그 해답이 있다.
==============================================================
2. NanoPi R2S Plus Overview
FriendlyElec사의 NanoPi R2S Plus를 하나 구입했다. 이유는 PQC WireGuard VPN Router를 만들어 보기 위해서이다. 이쯤되면 FriendlyElec사로 부터 상(?)이라도 하나 받아야 하지 않을까 ? 😛
https://www.friendlyelec.com/index.php?route=product/product&product_id=296
<NanoPi R2S Plus 선택 이유>
가격이 아주 저렴하다. Case 포함 $36 (단, Power adapter는 제외) => 다해도 $40면 충분!
2개의 Ethernet port(WAN port는 USB 3.0 기반임)가 나와 있어 Security Gateway로 만들 수 있다.
eMMC(32GB)가 장착되어 있다. microSD로만 부팅하는 구조의 경우 보안상 문제가 될 수 있다.
Wi-Fi chipset이 장착되어 있다(이건 option이고, $9.99 추가 비용 발생).
Case외부에 debug interface(USB 3.0)가 나와 있다.
NanoPi는 OrangePi 등 타 Pi 류에 비해 상당히 안정적이다(상품화하는데 무리가 없음).
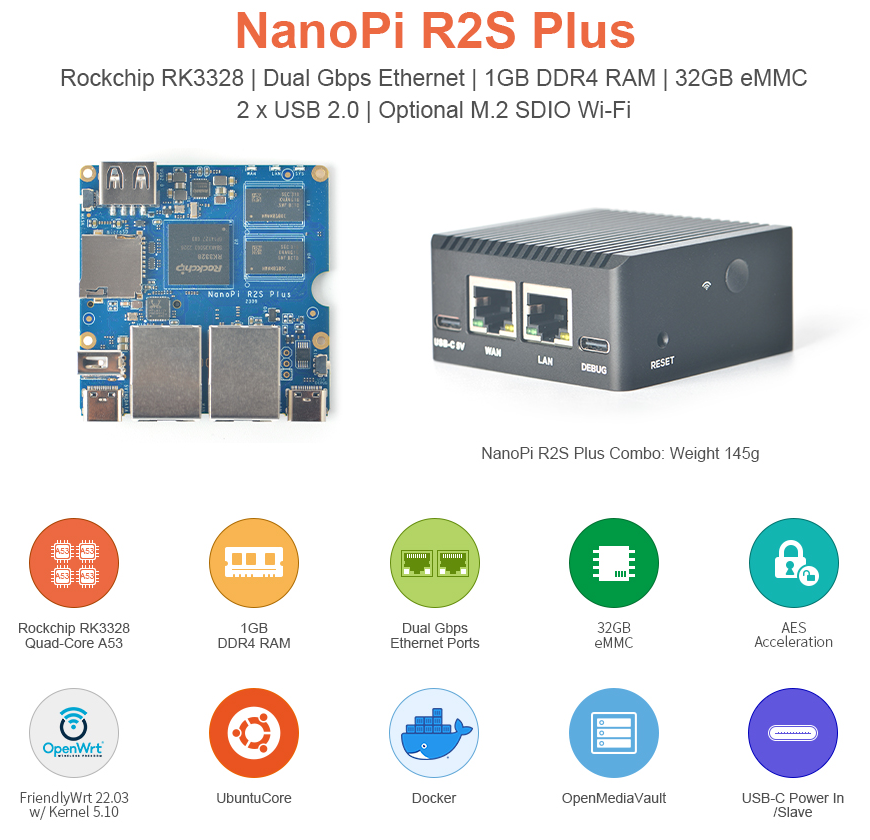
[그림 2.1] NanoPi R2S Plus(1) - 주요 특징
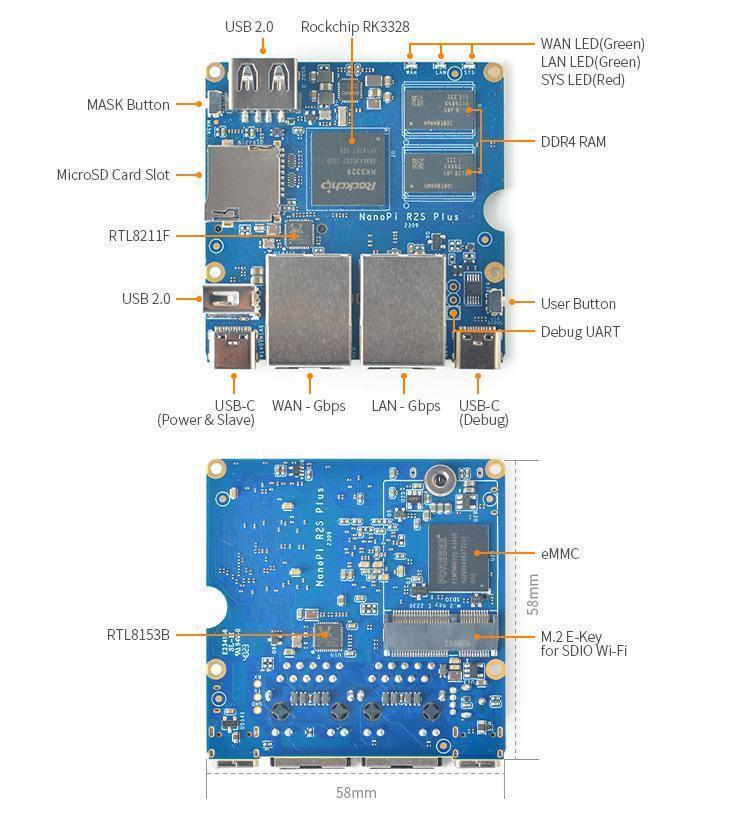
[그림 2.2] NanoPi R2S Plus(2) - 보드 top/bottom
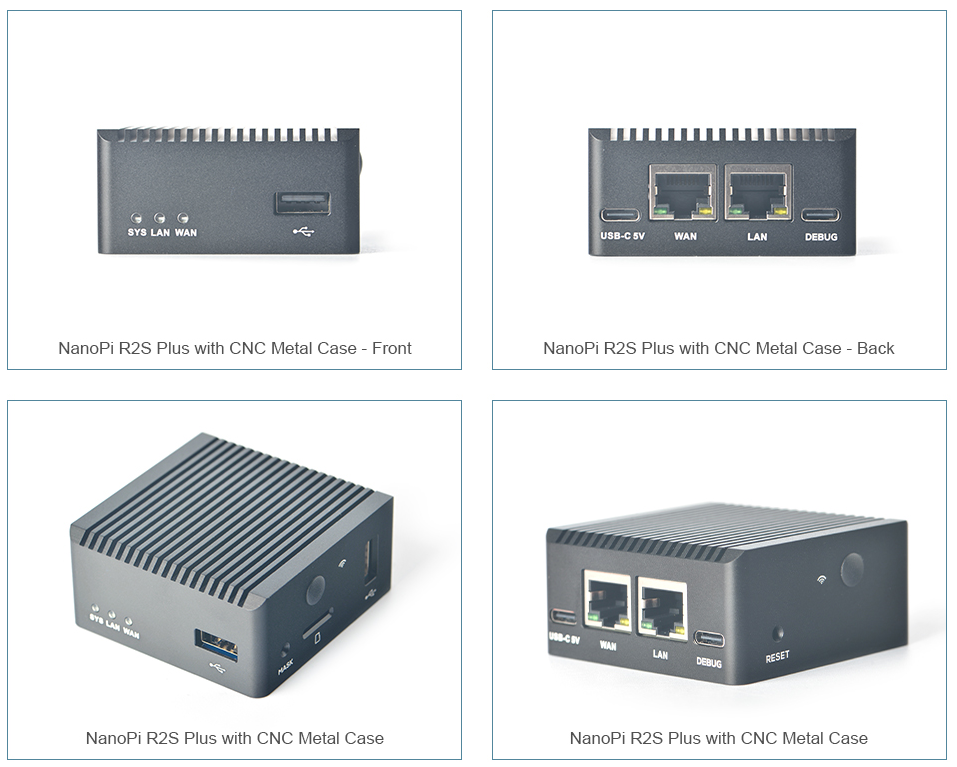
[그림 2.3] NanoPi R4S Plus(3) - Metal Case
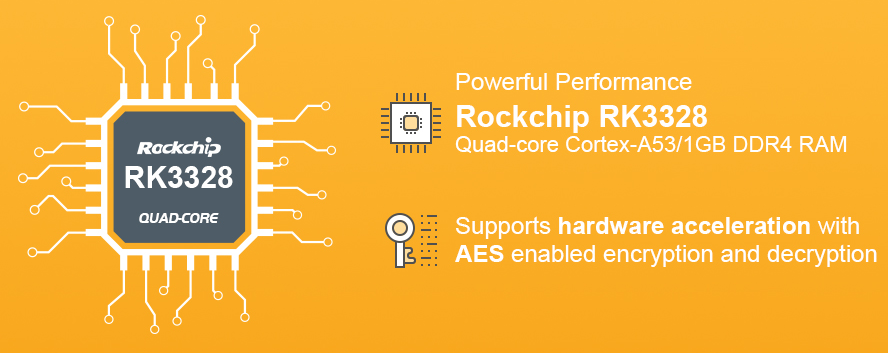
[그림 2.4] NanoPi R4S Plus(4) - Cortex-A53 CPU Core(Quad-core)
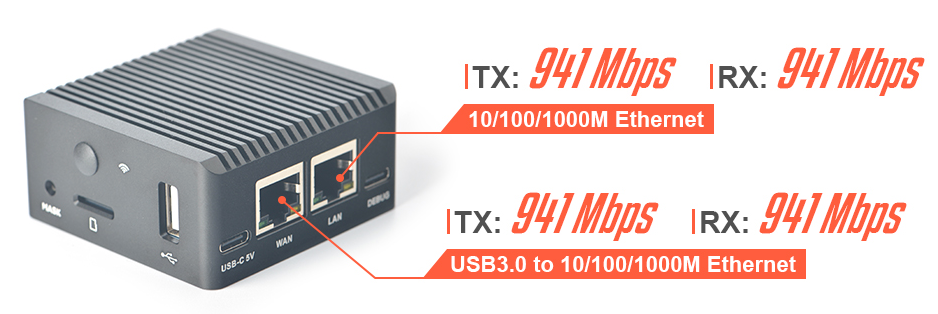
[그림 2.5] NanoPi R4S Plus(5) - Network Speed
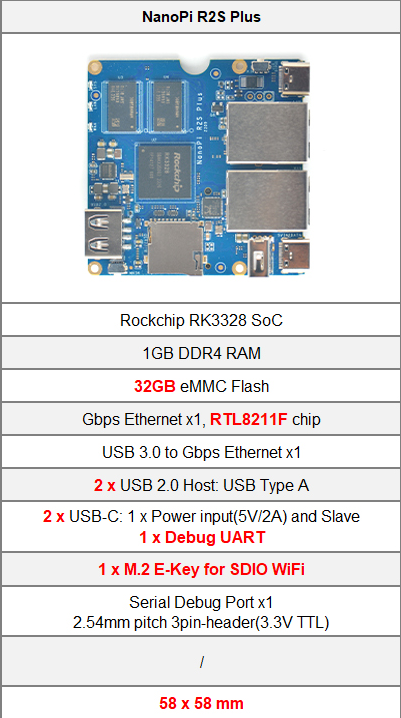
[그림 2.6] NanoPi R2S Plus - Specifications
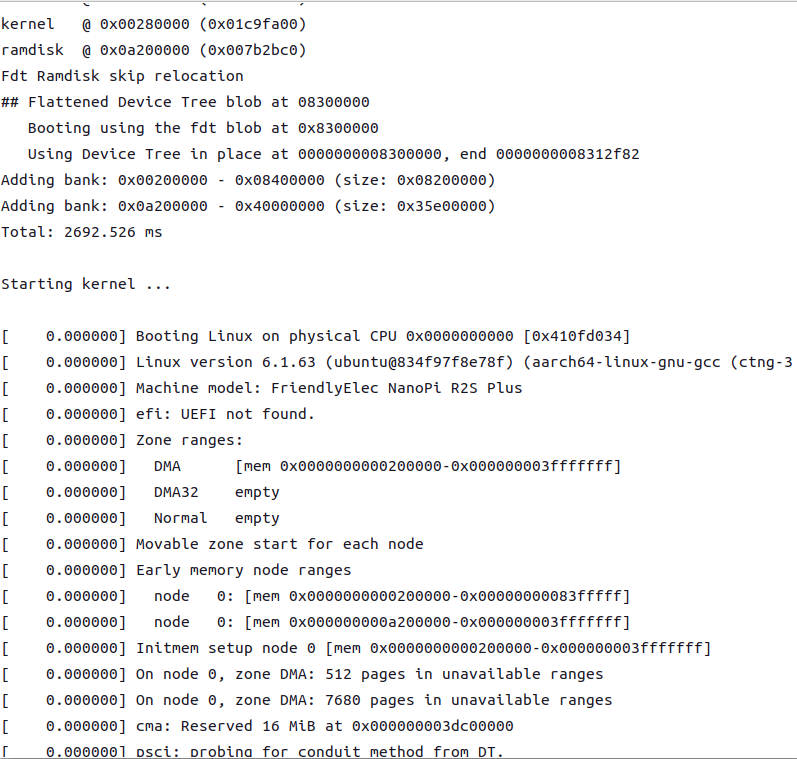
[그림 2.7] NanoPi R2S Plus 부팅 모습(Serial Console: 1500000, 8N1)
보다 자세한 사항은 아래 link를 참조하기 바란다.
https://wiki.friendlyelec.com/wiki/index.php/NanoPi_R2S_Plus
3. NanoPi 용 f/w image build 및 write 하기
이번 장에서는 friendlywrt-rk3328(OpenWrt) source code를 내려 받아 build하는 과정을 소개하고자 한다. 이번 장에서 소개하는 내용은 아래 wiki page의 9절 내용(Build Openwrt/Friendlywrt)을 참조하였다.
https://wiki.friendlyelec.com/wiki/index.php/NanoPi_R2S_Plus
📌 NanoPi R2S Plus에는 다양한 linux 배포판이 탑재될 수 있다. 하지만, 이번 posting에서는 OpenWrt만 관심이 있는 바, 이번에 소개하는 내용은 friendlywrt(NanoPi용 openwrt)로 국한하기로 한다.
a) source code download
$ mkdir friendlywrt23-rk3328
$ cd friendlywrt23-rk3328
$ git clone https://github.com/friendlyarm/repo --depth 1 tools
$ tools/repo init -u https://github.com/friendlyarm/friendlywrt_manifests -b master-v23.05 -m rk3328.xml --repo-url=https://github.com/friendlyarm/repo --no-clone-bundle
$ tools/repo sync -c --no-clone-bundle
b) source code build하기
<Build 전 준비 사항>
Python2가 설치되어 있어야 함. Python3로 할 경우, 에러 발생함.
Ubuntu 22.04에서 build 함. 하위 버젼에서 할 경우, 에러 발생함.
Intel i7 processor, RAM이 최소 16GB 정도는 되어야 build를 빨리 끝낼 수 있다.
$ ./build.sh rk3328.mk
- 얘는 u-boot, kernel, friendlywrt(OpenWrt)를 차례로 build함.
- 에러#1 : u-boot 관련 error 발생
- 에러#2 : friendlywrt 관련 packages 디렉토리 내용이 없다는 식의 에러 발생
<build 시 아래 에러#1 발생>
using config device/friendlyelec/rk3328/rk3328.mk ============Start building uboot============ SRC = /mnt/hdd/workspace/mini_devices/04062024/friendlywrt23-rk3328/u-boot TARGET_ARCH = arm64 TARGET_PLAT = rk3328 TARGET_UBOOT_CONFIG=nanopi_r2_defconfig TARGET_OSNAME = friendlywrt ========================================= uboot src: /mnt/hdd/workspace/mini_devices/04062024/friendlywrt23-rk3328/u-boot make for nanopi_r2_defconfig by -j48 HOSTCC scripts/basic/fixdep HOSTCC scripts/kconfig/conf.o SHIPPED scripts/kconfig/zconf.tab.c SHIPPED scripts/kconfig/zconf.lex.c SHIPPED scripts/kconfig/zconf.hash.c HOSTCC scripts/kconfig/zconf.tab.o HOSTLD scripts/kconfig/conf # # configuration written to .config # scripts/kconfig/conf --silentoldconfig Kconfig CHK include/config.h UPD include/config.h … … … DTC arch/arm/dts/rk3288-popmetal.dtb DTC arch/arm/dts/rk3288-rock2-square.dtb DTC arch/arm/dts/rk3288-tinker.dtb DTC arch/arm/dts/rk3288-veyron-jerry.dtb Error: arch/arm/dts/.rk3036-sdk.dtb.pre.tmp:77.1-10 syntax error FATAL ERROR: Unable to parse input tree make[2]: *** [scripts/Makefile.lib:319: arch/arm/dts/rk3036-sdk.dtb] Error 1 make[2]: *** Waiting for unfinished jobs.... DTC arch/arm/dts/rk3288-veyron-mickey.dtb Error: arch/arm/dts/.rk3188-radxarock.dtb.pre.tmp:383.1-10 syntax error FATAL ERROR: Unable to parse input tree make[2]: *** [scripts/Makefile.lib:319: arch/arm/dts/rk3188-radxarock.dtb] Error 1 make[1]: *** [dts/Makefile:101: arch-dtbs] Error 2 make: *** [Makefile:883: dts/dt.dtb] Error 2 make: *** Waiting for unfinished jobs....
|
아무래도 u-boot build 시 에러가 발생하는 듯 싶다. 그렇다면 U-boot만 단독으로 build해 보자.
$ ./build.sh uboot
- dtb 관련 build error 발생
- u-boot/Makefile 파일 수정
- u-boot/arch/arm/dts/Makefile 파일 수정
<u-boot build 시 아래 발생>
DTC arch/arm/dts/rk3368-sheep.dtb DTC arch/arm/dts/rk3368-geekbox.dtb Error: arch/arm/dts/.rk3036-sdk.dtb.pre.tmp:77.1-10 syntax error FATAL ERROR: Unable to parse input tree Error: arch/arm/dts/.rk3188-radxarock.dtb.pre.tmp:383.1-10 syntax error FATAL ERROR: Unable to parse input tree make[2]: *** [scripts/Makefile.lib:319: arch/arm/dts/rk3036-sdk.dtb] 오류 1 make[2]: *** 끝나지 않은 작업을 기다리고 있습니다.... make[2]: *** [scripts/Makefile.lib:319: arch/arm/dts/rk3188-radxarock.dtb] 오류 1 DTC arch/arm/dts/rk3368-px5-evb.dtb Error: arch/arm/dts/.rk3368-geekbox.dtb.pre.tmp:320.1-10 syntax error FATAL ERROR: Unable to parse input tree make[2]: *** [scripts/Makefile.lib:319: arch/arm/dts/rk3368-geekbox.dtb] 오류 1 Error: arch/arm/dts/.rk3368-sheep.dtb.pre.tmp:288.1-10 syntax error FATAL ERROR: Unable to parse input tree make[2]: *** [scripts/Makefile.lib:319: arch/arm/dts/rk3368-sheep.dtb] 오류 1 Error: arch/arm/dts/.rk3368-px5-evb.dtb.pre.tmp:335.1-10 syntax error FATAL ERROR: Unable to parse input tree make[2]: *** [scripts/Makefile.lib:319: arch/arm/dts/rk3368-px5-evb.dtb] 오류 1 Error: arch/arm/dts/.rk3368-lion.dtb.pre.tmp:196.1-10 syntax error FATAL ERROR: Unable to parse input tree make[2]: *** [scripts/Makefile.lib:319: arch/arm/dts/rk3368-lion.dtb] 오류 1 Error: arch/arm/dts/.rk3328-evb.dtb.pre.tmp:291.1-10 syntax error FATAL ERROR: Unable to parse input tree make[2]: *** [scripts/Makefile.lib:319: arch/arm/dts/rk3328-evb.dtb] 오류 1 make[1]: *** [dts/Makefile:101: arch-dtbs] 오류 2 make: *** [Makefile:883: dts/dt.dtb] 오류 2 make: *** 끝나지 않은 작업을 기다리고 있습니다.... ---------------------------------------------- |
<u-boot에러 이므로, 아래와 같이 수정>
u-boot/Makefile ================
KBUILD_CFLAGS += $(call cc-disable-warning, address-of-packed-member) # -- -- -- KBUILD_CFLAGS += -fshort-wchar -Werror KBUILD_AFLAGS := -D__ASSEMBLY__
u-boot/arch/arm/dts/Makefile =============================
dtb-$(CONFIG_ARCH_ROCKCHIP) += \ # 이 아래의 dtb 중 build 에러 발생시키는 것들은 과감히 제거 (아래에 표시된 내용만 남기고 나머지를 제거하면 됨) rk3066a-mk808.dtb \ rk3126-evb.dtb \ rk3128-evb.dtb \ rk3288-evb.dtb \ rk3288-fennec.dtb \ rk3288-firefly.dtb \ rk3288-miqi.dtb \ rk3288-phycore-rdk.dtb \ rk3288-popmetal.dtb \ rk3288-rock2-square.dtb \ rk3288-tinker.dtb \ rk3288-veyron-jerry.dtb \ rk3288-veyron-mickey.dtb \ rk3288-veyron-minnie.dtb \ rk3288-vyasa.dtb \ rk3308-evb.dtb \ rv1108-evb.dtb dtb-$(CONFIG_ARCH_MESON) += \ meson-gxbb-odroidc2.dtb
|
📌 u-boot은 왠만해서는 nano pi에서 기본적으로 제공하는 것을 교체 없이 그대로 사용할 것이다. 실제로 eMMC flash writing 시에도 u-boot은 교체되지 않는다(kernel과 rootfs 부분만 교체될 것임).
$ ./build.sh rk3328.mk
-> u-boot 수정 후, 다시 build를 시도하면 이번에는 아래와 같이 friendlywrt 부분에서 에러가 나면서 종료된다.
📌 사실 다른 PC(Ubuntu 22.04 LTS, Intel i7, RAM 32GB)에서는 이 단계에서 곧 바로 build에 성공하였다.
<build 시 아래 에러#2 발생>
Checking 'fts.h'... ok. Checking 'obstack.h'... ok. Checking 'libintl.h'... ok. Checking 'ldconfig-stub'... ok. find: 'feeds/packages': No such file or directory Collecting package info: done find: 'feeds/packages': No such file or directory Collecting target info: done Create index file './feeds/luci.index' Collecting package info: done Collecting target info: done Create index file './feeds/routing.index' Collecting package info: done Collecting target info: done Create index file './feeds/telephony.index' ERROR: please fix feeds/telephony/net/freeswitch/Makefile - see logs/feeds/telephony/net/freeswitch/dump.txt for details ERROR: please fix feeds/telephony/net/kamailio/Makefile - see logs/feeds/telephony/net/kamailio/dump.txt for details Collecting package info: done Collecting target info: done ====Building friendlywrt failed!====
|
$ ./build.sh friendlywrt
-> friendlywrt만 단독 build해 본다.
-> 위와 동일한 에러가 발생한다.
그렇다면, friendlywrt를 손으로(?) build해 보자.
$ cd friendlywrt/
$ make -j1 V=s
- 위 명령을 실행하면, 곧 이어 menuconfig 화면 나옴. menuconfig 화면에서 아래와 같이 상단 설정 변경 후, Exit
- 이후 한참동안 build 진행 => 어라, 얘는 정상 build 된다.
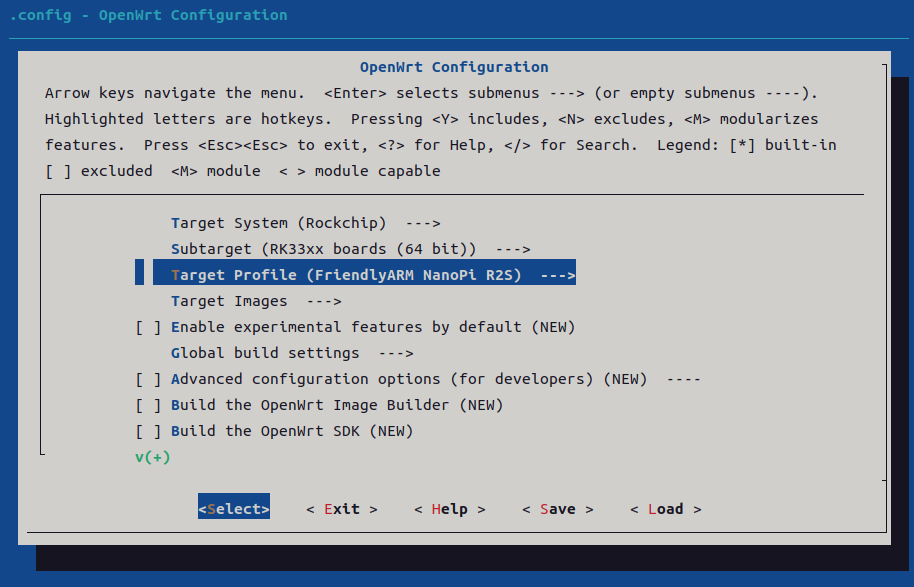
[그림 3.1] friendlywrt menuconfig
이 상태에서 ./build.sh rk3328.mk를 하면 희한하게 friendlywrt에서 다시 error가 난다. 따라서 friendlywrt를 다시 build해 보자.
$ ./build.sh friendlywrt
다시, 전체 build를 다시 시도하자.
$ ./build.sh rk3328.mk
…
0+0 레코드 들어옴
0+0 레코드 나감
0 bytes copied, 0.000259573 s, 0.0 kB/s
----------------------------------------------------------------
[out/friendlywrt_23.05_20240330_rk3328_arm64_sd.img] capacity = 1430MB, 1499999232 bytes
current out/friendlywrt_23.05_20240330_rk3328_arm64_sd.img partition:
----------------------------------------------------------------
parsing ./friendlywrt23/parameter.txt:
create new GPT 9:
----------------------------------------------------------------
copy from: ./friendlywrt23 to out/friendlywrt_23.05_20240330_rk3328_arm64_sd.img
[RAW. 0]: 100 KB | ./friendlywrt23/idbloader.img > 100% : done.
[RAW. 1]: 4096 KB | ./friendlywrt23/uboot.img > 100% : done.
[RAW. 2]: 4096 KB | ./friendlywrt23/trust.img > 100% : done.
[RAW. 3]: 48 KB | ./friendlywrt23/misc.img > 100% : done.
[RAW. 4]: 1 KB | ./friendlywrt23/dtbo.img > 100% : done.
[RAW. 5]: 2895 KB | ./friendlywrt23/resource.img > 100% : done.
[RAW. 6]: 29240 KB | ./friendlywrt23/kernel.img > 100% : done.
[RAW. 7]: 7882 KB | ./friendlywrt23/boot.img > 100% : done.
[RAW. 8]: 356696 KB | ./friendlywrt23/rootfs.img > 100% : done.
[RAW. 9]: 156 KB | ./friendlywrt23/userdata.img > 100% : done.
----------------------------------------------------------------
---------------------------------
RAW image successfully created (17:36:13).
-rw-rw-r-- 1 chyi chyi 1499999232 3월 30 17:36 out/friendlywrt_23.05_20240330_rk3328_arm64_sd.img
Tip: You can compress it to save disk space.
-----------------------------------------
Run the following command for sdcard install:
sudo dd if=out/friendlywrt_23.05_20240330_rk3328_arm64_sd.img bs=1M of=/dev/sdX
$ cd out
chyi@earth:/mnt/hdd/workspace/mini_devices/friendlywrt23-rk3328/out$ ls -la
합계 563048
drwxrwxr-x 13 chyi chyi 4096 3월 30 17:36 .
drwxrwxr-x 9 chyi chyi 4096 3월 30 17:35 ..
-rw-rw-r-- 1 chyi chyi 167 3월 30 16:11 .gitignore
drwx------ 2 chyi chyi 4096 3월 30 17:36 boot.r3u3AOxQu
drwxrwxr-x 7 chyi chyi 4096 3월 30 17:29 cryptodev-linux
-rw-rw-r-- 1 chyi chyi 1499999232 3월 30 17:36 friendlywrt_23.05_20240330_rk3328_arm64_sd.img
-rw-rw-r-- 1 chyi chyi 160552062 3월 30 17:36 friendlywrt_23.05_20240330_rk3328_arm64_sd.img.gz
drwxrwxr-x 4 chyi chyi 4096 3월 30 17:18 nft-fullcone
drwxrwxr-x 3 chyi chyi 4096 3월 30 17:29 output_rk3328_kmodules
drwxr-xr-x 19 chyi chyi 4096 3월 30 17:36 rootfs.VIYlrA6yB
drwxrwxr-x 8 chyi chyi 4096 3월 30 17:30 rtl8812au
drwxrwxr-x 9 chyi chyi 4096 3월 30 17:30 rtl8821CU
drwxrwxr-x 8 chyi chyi 4096 3월 30 17:30 rtl8822bu
drwxrwxr-x 8 chyi chyi 4096 3월 30 17:30 rtl8822ce
drwxrwxr-x 8 chyi chyi 4096 3월 30 17:30 rtl8822cs
drwxrwxr-x 4 chyi chyi 16384 3월 30 17:30 rtw88
여기까지 build 과정에 문제가 없었으니, 이제는 emmc용 image를 생성해 보자.
$ ./build.sh emmc-img
Bootloader image is fused successfully.
----------------------------------------------------------------
[/dev/loop12] capacity = 7438MB, 7799999488 bytes
current /dev/loop12 partition:
----------------------------------------------------------------
parsing ./eflasher/partmap.txt:
part.0 flash=mmc,1:loader:idb:0x8000,0x280000:idbloader.img:[RAW] ./eflasher/idbloader.img
part.1 flash=mmc,1:env:env:0x3f8000,0x8000::[RAW]
part.2 flash=mmc,1:parm:parm:0x400000,0x400000:param4sd.txt:[RAW] ./eflasher/param4sd.txt
part.3 flash=mmc,1:uboot:raw:0x800000,0x400000:uboot.img:[RAW] ./eflasher/uboot.img
part.4 flash=mmc,1:trust:raw:0xc00000,0x400000:trust.img:[RAW] ./eflasher/trust.img
part.5 flash=mmc,1:misc:raw:0x1000000,0x400000::[RAW]
part.6 flash=mmc,1:resc:raw:0x1400000,0xc00000:resource.img:[RAW] ./eflasher/resource.img
part.7 flash=mmc,1:kern:raw:0x2000000,0x2000000:kernel.img:[RAW] ./eflasher/kernel.img
part.8 flash=mmc,1:boot:raw:0x4000000,0x2000000:boot.img:[RAW] ./eflasher/boot.img
part.9 flash=mmc,1:data:fat:0x66000000,0x0::[MBR]
part.10 flash=mmc,1:rootfs:ext4:0x6000000,0x60000000:rootfs.img:[MBR] ./eflasher/rootfs.img
----------------------------------------------------------------
create new MBR 2:
[MBR.0] start : 0x0066000000 size 0x0000000000
[MBR.1] start : 0x0006000000 size 0x0060000000
----------------------------------------------------------------
copy from: ./eflasher to /dev/loop12
[RAW. 0]: 100 KB | ./eflasher/idbloader.img > 100% : done.
[RAW. 2]: 1 KB | ./eflasher/param4sd.txt > 100% : done.
[RAW. 3]: 4096 KB | ./eflasher/uboot.img > 100% : done.
[RAW. 4]: 4096 KB | ./eflasher/trust.img > 100% : done.
[RAW. 6]: 3935 KB | ./eflasher/resource.img > 100% : done.
[RAW. 7]: 29112 KB | ./eflasher/kernel.img > 100% : done.
[RAW. 8]: 7882 KB | ./eflasher/boot.img > 100% : done.
[MBR. 1]: 745460 KB | ./eflasher/rootfs.img > 100% : done.
----------------------------------------------------------------
/dev/loop12: msdos partitions 2 1
---------------------------------
All done.
exfatprogs version : 1.1.3
Creating exFAT filesystem(/dev/loop12p1, cluster size=32768)
Writing volume boot record: done
Writing backup volume boot record: done
Fat table creation: done
Allocation bitmap creation: done
Upcase table creation: done
Writing root directory entry: done
Synchronizing...
exFAT format complete!
---------------------------------
RAW image successfully created (17:59:08).
-rw-r--r-- 1 root root 7799999488 3월 30 17:59 out/rk3328-eflasher-20240330.img
Tip: You can compress it to save disk space.
copying /mnt/hdd/workspace/mini_devices/friendlywrt23-rk3328/scripts/sd-fuse/friendlywrt23/* to /tmp/media_exfat/friendlywrt23 ...
-rw-r--r-- 1 root root 7799999488 3월 30 17:59 out/friendlywrt_23.05_20240330_rk3328_arm64_eflasher.img
all done.
-----------------------------------------
Run the following command for sdcard install:
sudo dd if=out/friendlywrt_23.05_20240330_rk3328_arm64_eflasher.img bs=1M of=/dev/sdX
-----------------------------------------
<Build 절차 요약>
$ ./build.sh rk3328.mk
$ ./build.sh uboot $ cd friendlywrt/ $ make -j1 V=s $ ./build.sh friendlywrt
$ ./build.sh rk3328.mk $ ./build.sh emmc-img $ ./build.sh sd-img |
c) friendlywrt image를 eMMC에 writing하기
<eMMC에 booting image 설치하기>
아래와 같이 eMMC용 image를 microSD에 write 한다(Ubuntu 환경).
sudo dd if=out/friendlywrt_23.05_20240330_rk3328_arm64_eflasher.img bs=1M of=/dev/sdb
📌 주의: /dev/sdb 자리에는 자신의 PC에서 microSD가 인식된 내용으로 대체해 주어야 한다.
📌 주의: 7GB size의 파일을 dd로 writing 하는데 생각보다 오랜 시간이 걸린다(10분 이상 걸림).
📌 참고: eMMC writing 방법은 microSD를 이용한 방법 외에도 (아직 해 보지는 않았지만) USB stick을 이용한 방법이 있다.
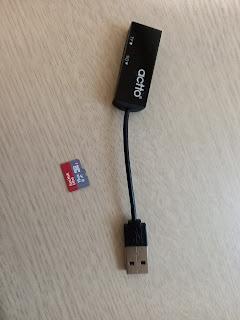
[그림 3.2] microSD와 microSD to USB converter
microSD를 target board에 장착하고, 전원을 켜면, (부팅하면서) 바로 eMMC writing을 진행한다.
eMMC fusing 진행 상태 확인은 Console에서 대략 확인 가능하다. 정확하게는 HDMI를 연결하면 볼 수 있다고 하는데, (번거로워) 해 보지 않았다. 또한 LED blinking으로도 확인 가능하단다.
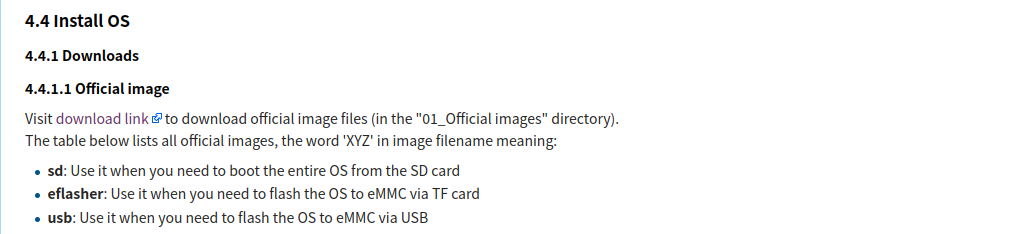
4.4.3.1 Option 1: Install OS via TF Card
This method firstly boots a mini Linux from a TF card and then automatically runs an EFlasher utility to install the OS to eMMC. You can connect your system to an HDMI monitor and watch its progress.
This is optional. You can watch its progress by observing its LEDs as well:
By default, flashing starts automatically upon power-up, so be sure to back up the data in eMMC. If you don't want it to start automatically, you can use image file with a filename containing the words 'multiple-os' and manually select the OS you want to flash on the interface.
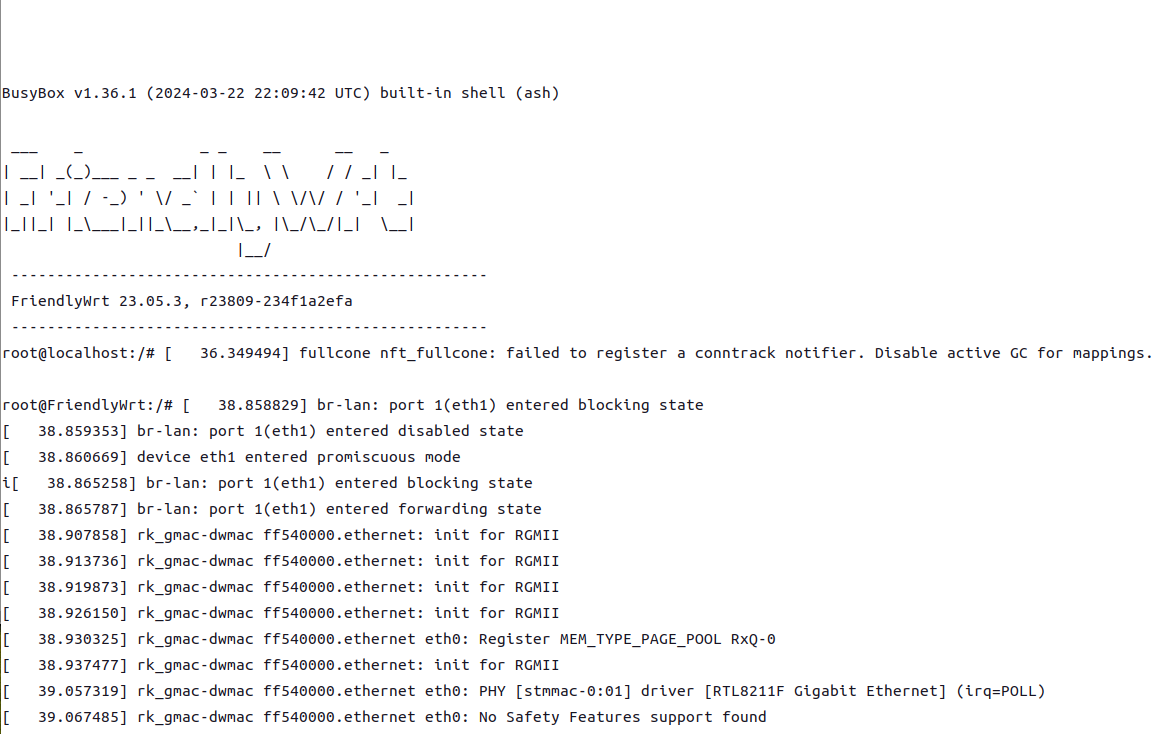
아래 로그는 microSD를 target board에 장착하고, 전원을 켠 후, Console 출력 내용을 확인한 것이다.

[그림 3.3] microSD로 부팅하면서 eMMC writing 하기(1)
[그림 3.4] microSD로 부팅하면서 eMMC writing 하기(2)
어라, 근데 위의 console log를 자세히 들여다 보니, 뜬금없이 Ubuntu 22.04.3 LTS가 보인다. 그렇다면, microSD에 올라간 image는 Ubuntu이며, Ubuntu가 부팅되면서 eMMC에 openwrt image를 설치하는 것으로 이해하면 될 것 같다.
d) eMMC fusing 실패시 복구 방법
만일 위의 과정이 실패할 경우, prebuilt image를 download 받아 설치하면 된다.
[그림 3.5] Prebuilt image download link(1)
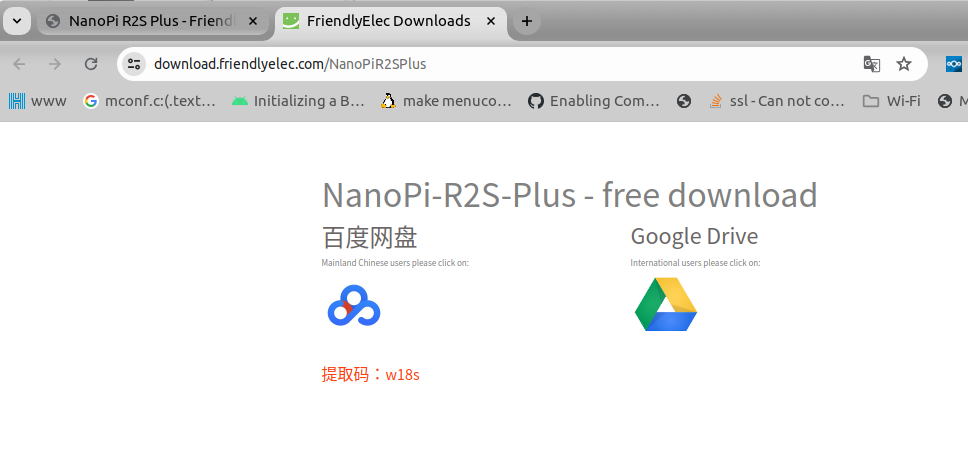
[그림 3.6] Prebuilt image download link(2) - Google Drive 선택
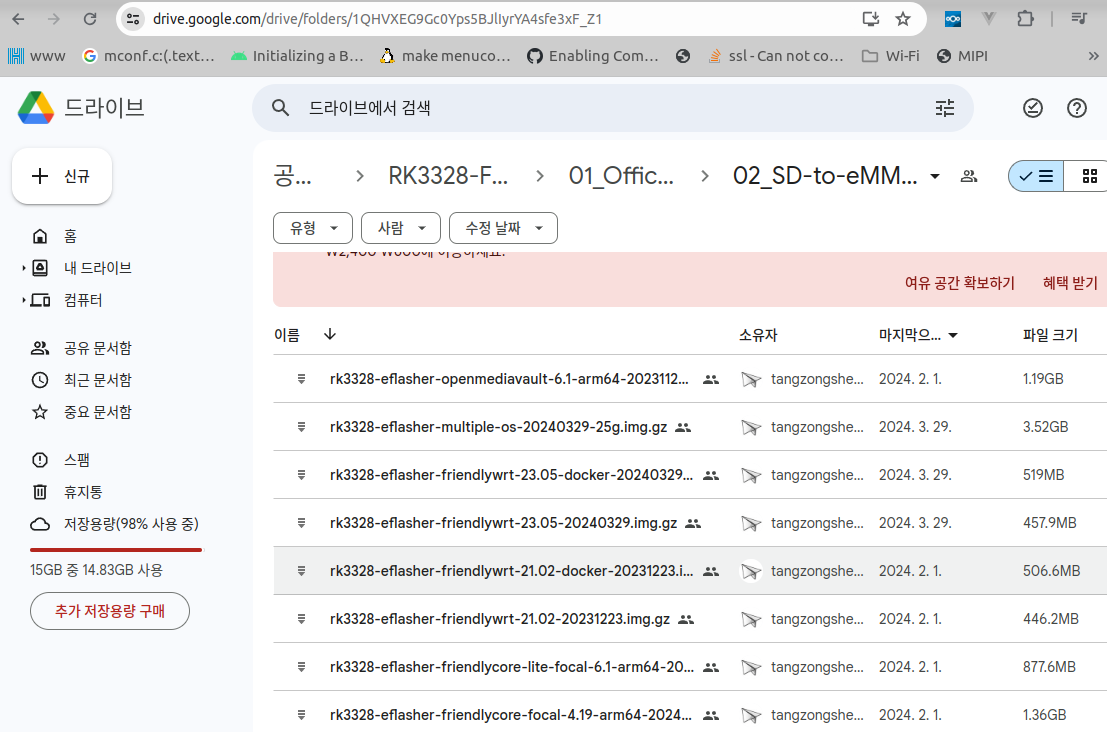
[그림 3.7] Prebuilt image download link(3) - 아래 파일 download
Rk3328-eflasher-friendlywrt-23.05-20231223.img
설치 방법은 앞서와 동일하므로, 여기서는 생략하기로 한다.
e) WebUI를 통한 eMMC fusing 방법
WebUI로 로긴이 가능할 경우, eMMC tools 메뉴(Luci: 시스템 메뉴 -> eMMC tools 메뉴)를 통해서도 eMMC writing이 가능하다. 주의할 점은 반드시 아래 파일을 사용해야 한다는 것이다(400MB 정도의 gz 압축 파일).
friendlywrt_23.05_20240330_rk3328_arm64_sd.img.gz
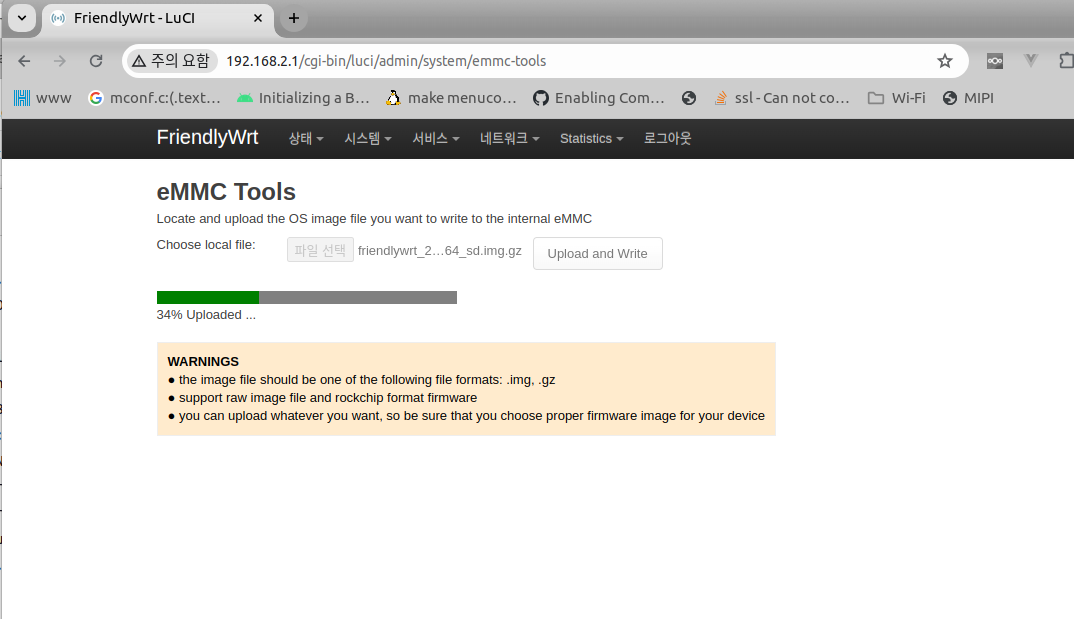
[그림 3.8] webUI eMMC tools 메뉴를 통한 eMMC flash writing 하기(1)

[그림 3.9] webUI eMMC tools 메뉴를 통한 eMMC flash writing 하기(2)
이후 NanoPi R2S Plus를 부팅해 보면 다음과 같다.
[그림 3.10] eMMC writing 후, 부팅하는 모습
부팅 후, ssh login을 시도해 본다.
$ ssh root@192.168.2.1
…
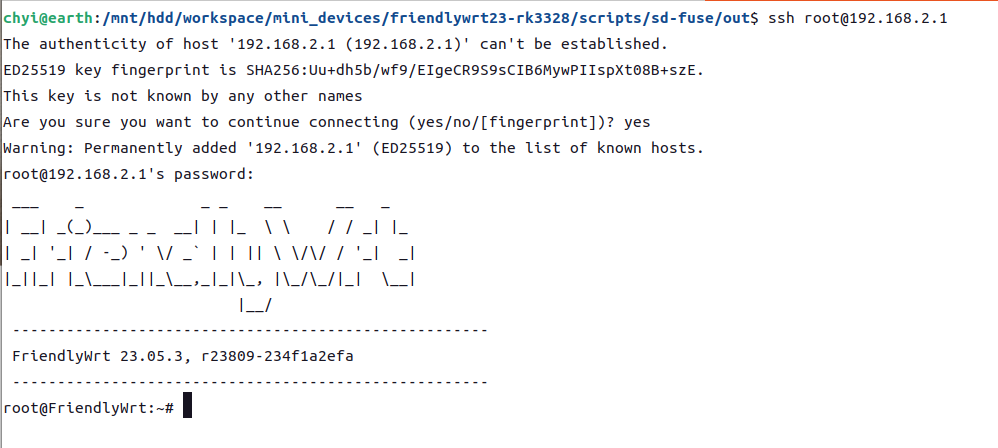
[그림 3.11] NanoPi R2S Plus ssh login 모습
$ ps w
root@FriendlyWrt:~/workspace# ps w PID USER VSZ STAT COMMAND 1 root 1960 S /sbin/procd 2 root 0 SW [kthreadd] 3 root 0 IW< [rcu_gp] 4 root 0 IW< [rcu_par_gp] 5 root 0 IW< [slub_flushwq] 6 root 0 IW< [netns] 10 root 0 IW< [mm_percpu_wq] 11 root 0 IW [rcu_tasks_rude_] 12 root 0 IW [rcu_tasks_trace] 13 root 0 SW [ksoftirqd/0] 14 root 0 IW [rcu_sched] 15 root 0 SW [migration/0] 17 root 0 SW [cpuhp/0] 18 root 0 SW [cpuhp/1] 19 root 0 SW [migration/1] 20 root 0 SW [ksoftirqd/1] 22 root 0 IW< [kworker/1:0H-ev] 23 root 0 SW [cpuhp/2] 24 root 0 SW [migration/2] 25 root 0 SW [ksoftirqd/2] 26 root 0 IW [kworker/2:0-eve] 27 root 0 IW< [kworker/2:0H-ev] 28 root 0 SW [cpuhp/3] 29 root 0 SW [migration/3] 30 root 0 SW [ksoftirqd/3] 33 root 0 SW [kdevtmpfs] 34 root 0 IW< [inet_frag_wq] 35 root 0 SW [kauditd] 36 root 0 SW [khungtaskd] 37 root 0 SW [oom_reaper] 39 root 0 IW< [writeback] 40 root 0 SW [kcompactd0] 41 root 0 SWN [khugepaged] 42 root 0 IW< [cryptd] 43 root 0 IW< [kintegrityd] 44 root 0 IW< [kblockd] 45 root 0 IW< [blkcg_punt_bio] 46 root 0 IW< [ata_sff] 47 root 0 IW< [devfreq_wq] 49 root 0 SW [watchdogd] 51 root 0 IW [kworker/1:1-eve] 54 root 0 IW< [rpciod] 55 root 0 IW< [xprtiod] 56 root 0 IW [kworker/3:1-eve] 58 root 0 SW [kswapd0] 59 root 0 IW< [nfsiod] 60 root 0 IW< [kthrotld] 66 root 0 SW [irq/22-rockchip] 67 root 0 SW [irq/23-rockchip] 68 root 0 SW [irq/24-rockchip] 69 root 0 SW [irq/25-rockchip] 70 root 0 SW [hwrng] 71 root 0 IW< [nvme-wq] 72 root 0 IW< [nvme-reset-wq] 73 root 0 IW< [nvme-delete-wq] 74 root 0 IW< [stmmac_wq] 76 root 0 SW [irq/38-rk805] 77 root 0 IW [kworker/1:2-eve] 78 root 0 SW [irq/47-rockchip] 79 root 0 IW< [dm_bufio_cache] 80 root 0 IW< [mld] 81 root 0 IW< [ipv6_addrconf] 82 root 824 S bpfilter_umh 83 root 0 SW< [krfcommd] 86 root 0 IW< [zswap-shrink] 87 root 0 IW< [kworker/u9:0] 195 root 0 IW< [kworker/3:1H-kb] 199 root 0 IW< [mmc_complete] 201 root 0 IW< [kworker/3:2H] 211 root 0 IW< [kworker/2:2H-kb] 215 root 0 IW< [kworker/1:2H-kb] 228 root 0 SW [jbd2/mmcblk2p8-] 229 root 0 IW< [ext4-rsv-conver] 239 root 0 SW [jbd2/mmcblk2p9-] 240 root 0 IW< [ext4-rsv-conver] 256 root 0 IW< [tpm_dev_wq] 257 root 0 IW [kworker/0:3-eve] 571 ubus 1380 S /sbin/ubusd 594 root 912 S /sbin/askfirst /bin/login 664 root 1068 S /sbin/urngd 872 root 0 IW< [cfg80211] 945 root 0 IW< [cryptodev_queue] 970 root 0 IW< [fullcone nft_fu] 972 root 0 IW< [uas] 1211 logd 1336 S /sbin/logd -S 64 1266 root 4064 S /sbin/rpcd -s /var/run/ubus/ubus.sock -t 30 1521 root 1152 S /usr/sbin/dropbear -F -P /var/run/dropbear.1.pid -p 22 -K 300 -T 3 -W 262144 1786 root 2768 S {hostapd} /sbin/ujail -t 5 -n hostapd -U network -G network -C /etc/capabilitiesi 1787 root 2768 S {wpa_supplicant} /sbin/ujail -t 5 -n wpa_supplicant -U network -G network -C /et 1790 network 3748 S /usr/sbin/hostapd -s -g /var/run/hostapd/global 1791 network 3712 S /usr/sbin/wpa_supplicant -n -s -g /var/run/wpa_supplicant/global 1851 root 2072 S /sbin/netifd 2106 root 1736 S /usr/sbin/odhcpd 2268 root 1376 S /usr/sbin/crond -f -c /etc/crontabs -l 5 2601 root 7856 S /usr/sbin/uhttpd -f -h /www -r FriendlyWrt -x /cgi-bin -u /ubus -t 180 -T 30 -k p 2638 root 1048 S /usr/sbin/vsftpd 2694 root 1968 S /usr/bin/dbus-daemon --system --nofork 2881 nobody 2396 S avahi-daemon: running [FriendlyWrt.local] 3051 root 5172 SN /usr/sbin/collectd -C /tmp/collectd.conf -f 3173 root 1656 S /sbin/blockd 3807 root 944 S /usr/sbin/thd --socket /tmp/triggerhappy.socket --triggers /etc/triggerhappy/trin 4195 root 41108 S /usr/sbin/smbd -F 4196 root 27780 S /usr/sbin/nmbd -F 4257 root 2768 S {ntpd} /sbin/ujail -t 5 -n ntpd -U ntp -G ntp -C /etc/capabilities/ntpd.json -c b 4261 ntp 1372 S /usr/sbin/ntpd -n -N -S /usr/sbin/ntpd-hotplug -p time.apple.com -p ntp.tencent.o 4338 root 39400 S {smbd-notifyd} /usr/sbin/smbd -F 4341 root 39392 S {smbd-cleanupd} /usr/sbin/smbd -F 4370 root 35772 SN /usr/sbin/netdata -D -c /etc/netdata/netdata.conf 4393 root 12204 SN /usr/sbin/netdata --special-spawn-server 4707 root 8380 S /usr/bin/ttyd /bin/login 5454 root 960 S /usr/bin/wsdd2 -i br-lan -N FriendlyWrt -G WORKGROUP -b vendor:friendlyelec,modeS 5916 root 2768 S {dnsmasq} /sbin/ujail -t 5 -n dnsmasq -u -l -r /bin/ubus -r /etc/TZ -r /etc/dnsm- 5918 dnsmasq 5128 S /usr/sbin/dnsmasq -C /var/etc/dnsmasq.conf.cfg01411c -k -x /var/run/dnsmasq/dnsmd 5933 root 5116 S /usr/sbin/dnsmasq -C /var/etc/dnsmasq.conf.cfg01411c -k -x /var/run/dnsmasq/dnsmd 6292 root 1080 S odhcp6c -s /lib/netifd/dhcpv6.script -P0 -t120 eth0 6295 root 1372 S udhcpc -p /var/run/udhcpc-eth0.pid -s /lib/netifd/dhcp.script -f -t 0 -i eth0 -xC 6487 root 1444 SN /usr/sbin/nlbwmon -o /var/lib/nlbwmon -b 524288 -i 24h -r 30s -p /usr/share/nlbw1 7732 root 2996 S -bash 10759 root 0 IW [kworker/0:0-eve] 12538 root 0 IW [kworker/2:1-eve] 17283 root 0 IW< [kworker/0:1H-kb] 18169 root 0 IW< [kworker/0:0H-mm] 19323 root 0 IW [kworker/u8:0-ev] 19550 root 2932 SN bash /usr/lib/netdata/plugins.d/tc-qos-helper.sh 2 19603 root 0 IW [kworker/u8:2-ev] 19878 root 0 IW [kworker/u8:3-ev] 20037 root 0 IW [kworker/3:0-eve] 20151 root 0 IW [kworker/u8:1-ev] 20301 root 0 IW [kworker/1:0-mm_] 20451 root 0 IW< [kworker/0:2H-kb] 20458 root 1380 R ps w root@FriendlyWrt:~/workspace# |
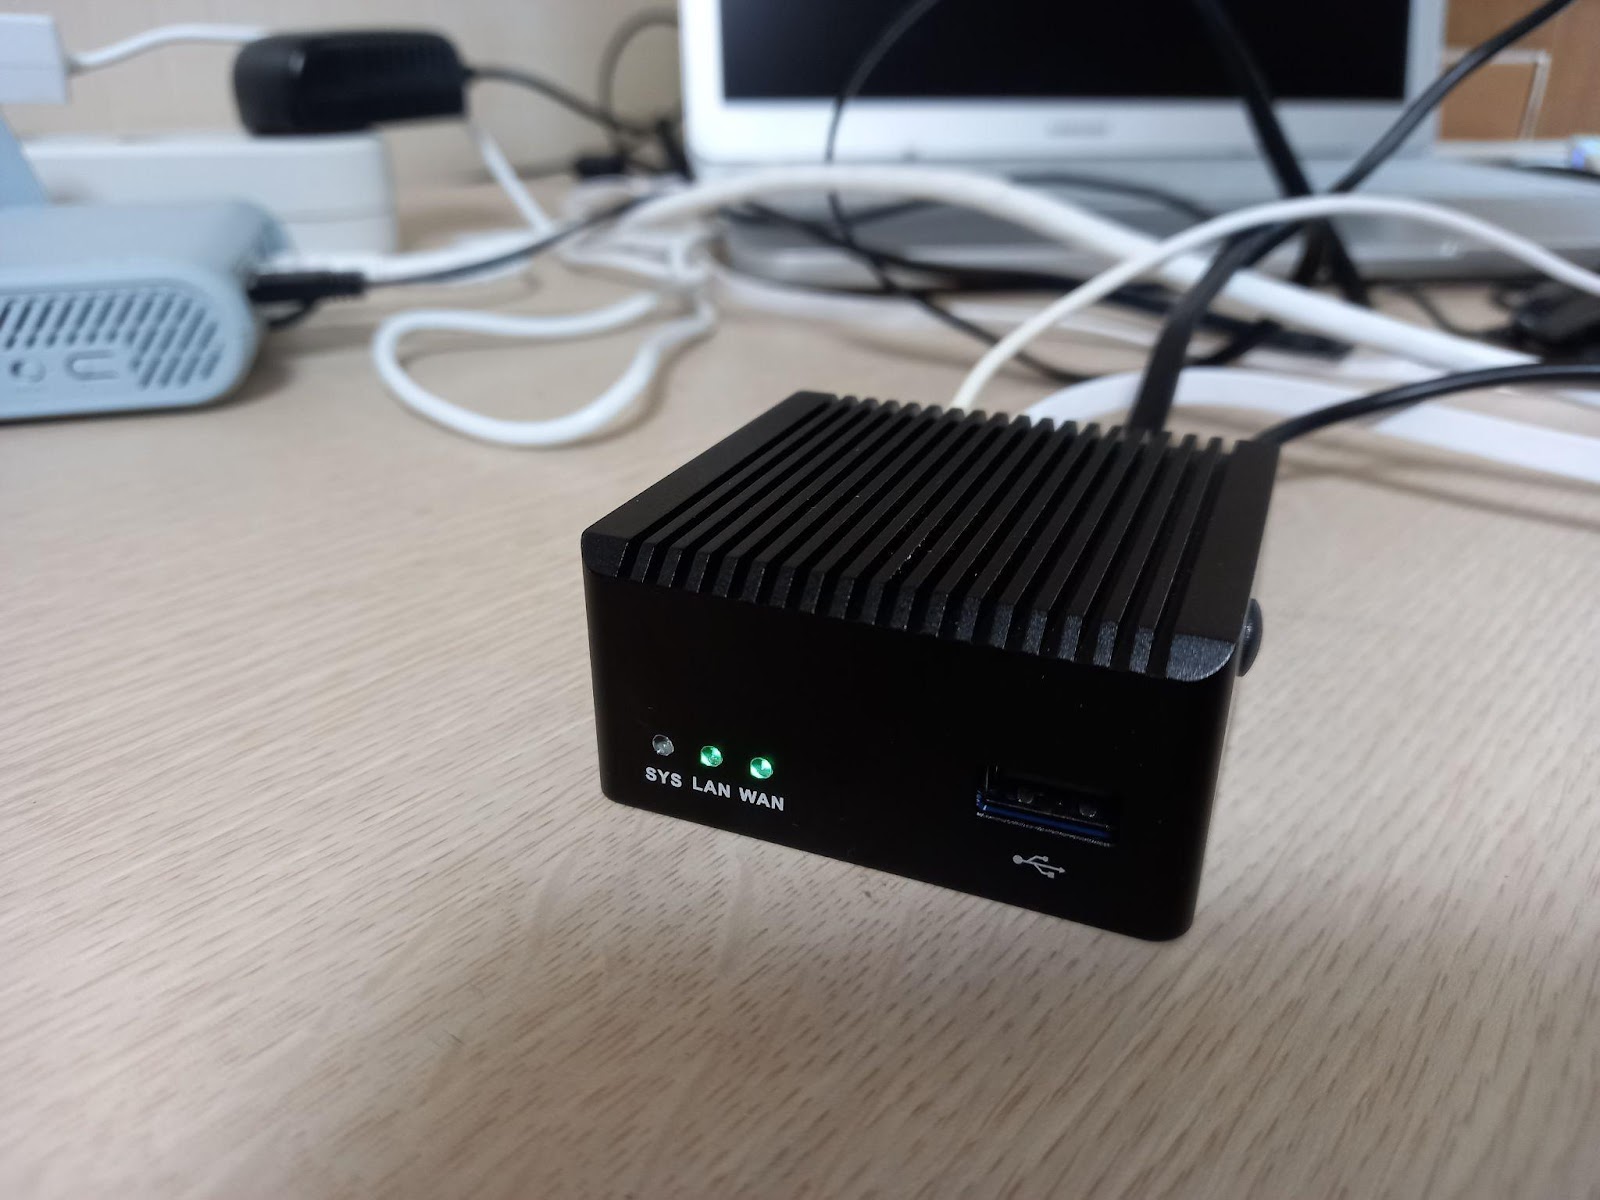
[그림 3.12] NanoPi R2S Plus 구동 모습
여기까지 NanoPi R2S Plus source code를 build한 후, eMMC에 writing하기 까지의 절차를 살펴 보았다.


