
이번 posting에서는 지난 시간에 이어 open source project인 DPDK와 FD.io VPP를 이용하여 고성능 WireGuard VPN 장비를 만드는 3가지 방법을 소개해 보고자 한다. 😎


- (A) VPP 기반의 WireGuard - 2, 3장
- (B) VPP와 Original WireGuard-Go 연동하기 - 4장
- (C) VPP와 L2 WireGuard 연동하기 - 5장


enp1s0: flags=4163<UP,BROADCAST,RUNNING,MULTICAST> mtu 1500
inet 192.168.3.1 netmask 255.255.255.0 broadcast 192.168.3.255
inet6 fe80::2e0:1dff:fe6b:bb44 prefixlen 64 scopeid 0x20<link>
ether 00:e0:1d:6b:bb:44 txqueuelen 1000 (Ethernet)
RX packets 417 bytes 31023 (31.0 KB)
RX errors 0 dropped 0 overruns 0 frame 0
TX packets 31 bytes 1762 (1.7 KB)
TX errors 0 dropped 0 overruns 0 carrier 0 collisions 0
device memory 0xd1000000-d10fffff
enp2s0: flags=4099<UP,BROADCAST,MULTICAST> mtu 1500
ether 00:e0:1d:6b:bb:45 txqueuelen 1000 (Ethernet)
RX packets 0 bytes 0 (0.0 B)
RX errors 0 dropped 0 overruns 0 frame 0
TX packets 0 bytes 0 (0.0 B)
TX errors 0 dropped 0 overruns 0 carrier 0 collisions 0
device memory 0xd0d00000-d0dfffff
enp3s0: flags=4163<UP,BROADCAST,RUNNING,MULTICAST> mtu 1500
inet 192.168.10.1 netmask 255.255.255.0 broadcast 192.168.10.255
inet6 fe80::2e0:1dff:fe6b:bb46 prefixlen 64 scopeid 0x20<link>
ether 00:e0:1d:6b:bb:46 txqueuelen 1000 (Ethernet)
RX packets 148 bytes 13464 (13.4 KB)
RX errors 0 dropped 0 overruns 0 frame 0
TX packets 53 bytes 7826 (7.8 KB)
TX errors 0 dropped 0 overruns 0 carrier 0 collisions 0
device memory 0xd0a00000-d0afffff
enp4s0: flags=4163<UP,BROADCAST,RUNNING,MULTICAST> mtu 1500
inet 192.168.8.132 netmask 255.255.255.0 broadcast 192.168.8.255
inet6 fe80::2e0:1dff:fe6b:bb47 prefixlen 64 scopeid 0x20<link>
ether 00:e0:1d:6b:bb:47 txqueuelen 1000 (Ethernet)
RX packets 435 bytes 27085 (27.0 KB)
RX errors 0 dropped 0 overruns 0 frame 0
TX packets 34 bytes 2858 (2.8 KB)
TX errors 0 dropped 0 overruns 0 carrier 0 collisions 0
device memory 0xd0700000-d07fffff
lo: flags=73<UP,LOOPBACK,RUNNING> mtu 65536
inet 127.0.0.1 netmask 255.0.0.0
inet6 ::1 prefixlen 128 scopeid 0x10<host>
loop txqueuelen 1000 (Local Loopback)
RX packets 84 bytes 6352 (6.3 KB)
RX errors 0 dropped 0 overruns 0 frame 0
TX packets 84 bytes 6352 (6.3 KB)
TX errors 0 dropped 0 overruns 0 carrier 0 collisions 0
📌 오래된(?) 사람이라 그런가, ip 명령 보다는 ifconfig, route 명령이 좀 더 익숙하다^^.
___________________________________________________________

-rw-r--r-- 1 chyi chyi 163486 6월 18 11:18 libvppinfra-dev_24.06-rc2~1-g624463342_amd64.deb
-rw-r--r-- 1 chyi chyi 198266 6월 18 11:18 libvppinfra_24.06-rc2~1-g624463342_amd64.deb
-rw-r--r-- 1 chyi chyi 28818 6월 18 11:18 python3-vpp-api_24.06-rc2~1-g624463342_amd64.deb
-rw-r--r-- 1 chyi chyi 96408338 6월 18 11:18 vpp-dbg_24.06-rc2~1-g624463342_amd64.deb
-rw-r--r-- 1 chyi chyi 1364866 6월 18 11:18 vpp-dev_24.06-rc2~1-g624463342_amd64.deb
-rw-r--r-- 1 chyi chyi 6017888 6월 18 11:18 vpp-plugin-core_24.06-rc2~1-g624463342_amd64.deb
-rw-r--r-- 1 chyi chyi 409128 6월 18 11:18 vpp-plugin-devtools_24.06-rc2~1-g624463342_amd64.deb
-rw-r--r-- 1 chyi chyi 5251560 6월 18 11:18 vpp-plugin-dpdk_24.06-rc2~1-g624463342_amd64.deb
-rw-r--r-- 1 chyi chyi 5296820 6월 18 11:18 vpp_24.06-rc2~1-g624463342_amd64.deb


$ sudo ifconfig enp4s0 down
$ sudo /usr/bin/dpdk-devbind.py --bind uio_pci_generic 01:00.0
$ sudo /usr/bin/dpdk-devbind.py --bind uio_pci_generic 04:00.0
$ sudo service vpp restart
root 821 3.4 1.4 85380388 119860 ? Ssl 02:14 1:54 /usr/bin/vpp -c /etc/vpp/startup.conf
[0] wg0 src:192.168.8.134 port:51820 private-key:EI9ujB+gZQakUIA4oQIgGGSNDqIPBAqNWDIQbVam1kE= 108f6e8c1fa06506a4508038a1022018648d0ea20f040a8d
5832106d56a6d641 public-key:NVC/buWHbT9ZU7OgObohA2aX2KtuRUknYTOv5Z7PGAc= 3550bf6ee5876d3f5953b3a039ba21036697d8ab6e4549276133afe59ecf1807 mac-
key: a1dc7d58a5c05285b029b0c7311bcf683fc31f6ea050e20d58cfc9cbb1c5bc66


<nanopi r2s plus>
# wg genkey | tee ./privatekey | wg pubkey > ./publickey
# ip link add dev wg0 type wireguard
# ip address add dev wg0 10.1.1.100/24
# ip link set up dev wg0


- 일단 stable version을 사용한 것이 답이었던 것 같다.
- 또한 peer vpn ip로 ping을 하기 위해 아래와 같은 routing entry를 추가해 줘야 한다는 깨달음(?)이 있었다.
- ip route add 10.1.1.100/32 via 10.1.1.200 wg0


<nanopi r2s plus>
# wg genkey | tee ./privatekey | wg pubkey > ./publickey
# ip link add dev wg0 type wireguard
# ip address add dev wg0 10.1.1.100/24
# ip link set up dev wg0
# wg set wg0 listen-port 51820 private-key ./keys/privatekey peer NVC/buWHbT9ZU7OgObohA2aX2KtuRUknYTOv5Z7PGAc= allowed-ips 0.0.0.0/0 endpoint 192.168.8.134:51820

Kernel IP routing table
Destination Gateway Genmask Flags MSS Window irtt Iface
10.1.1.0 0.0.0.0 255.255.255.0 U 0 0 0 wg0
192.168.3.0 0.0.0.0 255.255.255.0 U 0 0 0 eth0
192.168.8.0 0.0.0.0 255.255.255.0 U 0 0 0 eth3
192.168.10.0 0.0.0.0 255.255.255.0 U 0 0 0 enp3s0
📌 기존에는 없던, eth0, eth3, wg0 interface가 눈에 보인다. 심지어 이를 통해 통신도 가능하다.
chyi@vppbox:~$ ping 10.1.1.100
PING 10.1.1.100 (10.1.1.100) 56(84) bytes of data.
64 bytes from 10.1.1.100: icmp_seq=1 ttl=64 time=1.38 ms
64 bytes from 10.1.1.100: icmp_seq=2 ttl=64 time=1.32 ms
64 bytes from 10.1.1.100: icmp_seq=3 ttl=64 time=1.18 ms
^C
--- 10.1.1.100 ping statistics ---
3 packets transmitted, 3 received, 0% packet loss, time 2003ms
rtt min/avg/max/mdev = 1.177/1.294/1.384/0.086 ms
chyi@vppbox:~$ ping 192.168.3.1
PING 192.168.3.1 (192.168.3.1) 56(84) bytes of data.
64 bytes from 192.168.3.1: icmp_seq=1 ttl=64 time=0.036 ms
64 bytes from 192.168.3.1: icmp_seq=2 ttl=64 time=0.043 ms
64 bytes from 192.168.3.1: icmp_seq=3 ttl=64 time=0.045 ms
^C
--- 192.168.3.1 ping statistics ---
3 packets transmitted, 3 received, 0% packet loss, time 2052ms
rtt min/avg/max/mdev = 0.036/0.041/0.045/0.003 ms
chyi@vppbox:~$ ping 192.168.3.100
PING 192.168.3.100 (192.168.3.100) 56(84) bytes of data.
64 bytes from 192.168.3.100: icmp_seq=1 ttl=64 time=0.504 ms
64 bytes from 192.168.3.100: icmp_seq=2 ttl=64 time=0.258 ms
64 bytes from 192.168.3.100: icmp_seq=3 ttl=64 time=0.238 ms
^C
--- 192.168.3.100 ping statistics ---
3 packets transmitted, 3 received, 0% packet loss, time 2068ms
rtt min/avg/max/mdev = 0.238/0.333/0.504/0.120 ms
chyi@192.168.3.1's password:
=> ssh 접속도 가능하다.
* Documentation: https://help.ubuntu.com
* Management: https://landscape.canonical.com
* Support: https://ubuntu.com/pro
System information as of Wed Jun 19 03:16:35 AM UTC 2024
System load: 0.68 Swap usage: 0% Users logged in: 1
Usage of /: 11.7% of 56.88GB Temperature: 58.0 C
Memory usage: 29% Processes: 120
* Strictly confined Kubernetes makes edge and IoT secure. Learn how MicroK8s
just raised the bar for easy, resilient and secure K8s cluster deployment.
https://ubuntu.com/engage/secure-kubernetes-at-the-edge
Expanded Security Maintenance for Applications is not enabled.
35 updates can be applied immediately.
To see these additional updates run: apt list --upgradable
Enable ESM Apps to receive additional future security updates.
See https://ubuntu.com/esm or run: sudo pro status
Failed to connect to https://changelogs.ubuntu.com/meta-release-lts. Check your Internet connection or proxy settings
Last login: Wed Jun 19 09:06:03 2024 from 192.168.2.163
chyi@vppbox:~$


set acl-plugin acl set acl-plugin acl [index <idx>] <permit|deny|permit+reflect> src <PREFIX> dst
<PREFIX> [proto X] [sport X[-Y]] [dport X[-Y]] [tcpflags <int> mask <int>] [tag FOO] {use comma separated list for multipl
e rules}
set acl-plugin interface set acl-plugin interface <interface> <input|output> <acl INDEX> [del]
set acl-plugin set acl-plugin session timeout {{udp idle}|tcp {idle|transient}} <seconds>
ACL index:0
=> 192.168.2.0/24 -> 192.168.8.134로 향하는 icmp packet을 차단하는 rule을 추가한다.
vpp# set acl-plugin interface TwoDotFiveGigabitEthernet4/0/0 input acl 0
=> acl index:0 rule을 WAN interface(input 방향)에 적용한다. 이 상태에서 ping test를 해 보니 차단된다.
vpp# set acl-plugin acl deny src 192.168.2.0/24 dst 192.168.8.134 proto 6 dport 22
ACL index:1
vpp# set acl-plugin interface TwoDotFiveGigabitEthernet4/0/0 input acl 1
vpp# set acl-plugin interface TwoDotFiveGigabitEthernet4/0/0 input acl 1 del
vpp# set acl-plugin interface TwoDotFiveGigabitEthernet4/0/0 input acl 1
acl-index 0 count 1 tag {cli}
0: ipv4 deny src 192.168.2.0/24 dst 0.0.0.0/0 proto 0 sport 0-65535 dport 0-65535
applied inbound on sw_if_index:
used in lookup context index:
acl-index 1 count 1 tag {cli}
0: ipv4 deny src 192.168.2.0/24 dst 0.0.0.0/0 proto 0 sport 0-65535 dport 0-65535
applied inbound on sw_if_index: 2
used in lookup context index: 0
vpp# show acl-plugin interface
sw_if_index 0:
sw_if_index 1:
sw_if_index 2:
input acl(s): 1
_______________________________________________________________

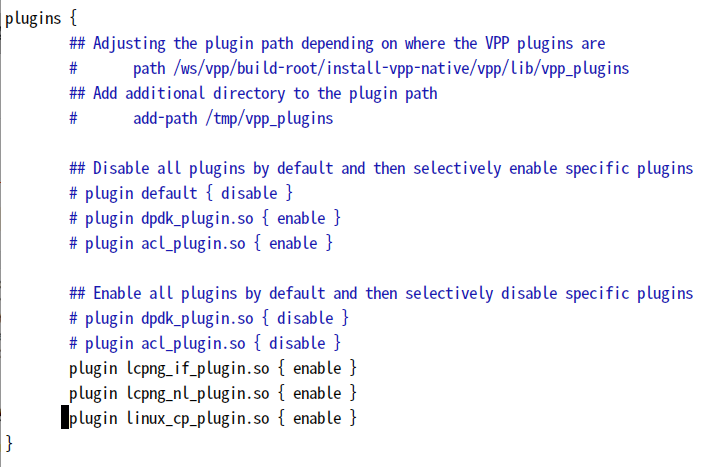
- lcp create 명령을 사용하여 physical interface(TwoDotFiveGigabitEthernet1/0/0, TwoDotFiveGigabitEthernet4/0/0)에 상응하는 Linux host 쪽 virtual interface(eth0, eth3)를 생성한다.
- (일반적으로 하듯이) wireguard-go를 WAN 쪽(eth3)에서 구동시킨다.
- WAN 쪽에 bridge(bvi1) interface를 하나 만들고, TwoDotFiveGigabitEthernet4/0/0 및 tap2(eth3과 연결되는 tap interface) interface를 bridge에 포함시킨다. 즉, bridge bvi1 = { TwoDotFiveGigabitEthernet4/0/0 + tap2 } 형태가 되도록 ...
- tap2는 eth3와 연결되어 있기 때문에 이를 bridge에 추가시키는 것으로 wireguard-go 구동되는 조건이 만들어 진다.

# set int state TwoDotFiveGigabitEthernet4/0/0 up
# set int ip address TwoDotFiveGigabitEthernet1/0/0 192.168.3.1/24
# set int ip address TwoDotFiveGigabitEthernet4/0/0 192.168.8.134/24
# lcp create TwoDotFiveGigabitEthernet1/0/0 host-if eth0
# lcp create TwoDotFiveGigabitEthernet4/0/0 host-if eth3
# lcp lcp-sync on
# bvi create instance 1
# set int l2 bridge bvi1 2 bvi
# set int ip address bvi1 10.1.1.200/24
# set int state bvi1 up
=> l2 bridge interface bvi1을 생성하고, vpn ip 10.1.1.200을 할당해 준다.
# set int l2 bridge TwoDotFiveGigabitEthernet4/0/0 2
# set int l2 bridge tap2 2
=> bridge interface에 TwoDotFiveGigabitEthernet4/0/0와 tap2를 추가한다.
$ sudo ip address add dev wg0 10.1.1.200/24
$ sudo ip link set up dev wg0
$ sudo wg set wg0 listen-port 51820 private-key /home/chyi/workspace/keys/privatekey peer jkOW74X1CRS8fobzmYYPGDkyVhR5rdEa9u
h8QA2O/0k= allowed-ips 0.0.0.0/0 endpoint 192.168.8.182:51820
<nanopi r2s plus>
# wg genkey | tee ./privatekey | wg pubkey > ./publickey
# ip link add dev wg0 type wireguard
# ip address add dev wg0 10.1.1.100/24
# ip link set up dev wg0
PING 10.1.1.200 (10.1.1.200) 56(84) bytes of data.
64 bytes from 10.1.1.200: icmp_seq=1 ttl=63 time=2.03 ms
64 bytes from 10.1.1.200: icmp_seq=2 ttl=63 time=4.34 ms
64 bytes from 10.1.1.200: icmp_seq=3 ttl=63 time=1.88 ms
^C
--- 10.1.1.200 ping statistics ---
3 packets transmitted, 3 received, 0% packet loss, time 2002ms
rtt min/avg/max/mdev = 1.884/2.749/4.335/1.123 ms
PING 192.168.3.1 (192.168.3.1) 56(84) bytes of data.
64 bytes from 192.168.3.1: icmp_seq=1 ttl=63 time=2.07 ms
64 bytes from 192.168.3.1: icmp_seq=2 ttl=63 time=2.11 ms
64 bytes from 192.168.3.1: icmp_seq=3 ttl=63 time=1.87 ms
64 bytes from 192.168.3.1: icmp_seq=4 ttl=63 time=1.82 ms
64 bytes from 192.168.3.1: icmp_seq=5 ttl=63 time=1.91 ms
^C
--- 192.168.3.1 ping statistics ---
5 packets transmitted, 5 received, 0% packet loss, time 4005ms
rtt min/avg/max/mdev = 1.823/1.957/2.114/0.115 ms
chyi@192.168.3.1's password:
Welcome to Ubuntu 24.04 LTS (GNU/Linux 6.8.0-35-generic x86_64)
* Documentation: https://help.ubuntu.com
* Management: https://landscape.canonical.com
* Support: https://ubuntu.com/pro
(다각도로 시도해 보았으나) 결국, vpp 외부에 wireguard-go를 두고 운영하는 방법은 Gateway 방식은 불가하며, standalone server로 구성할 경우 의미가 있어 보인다.
인터넷을 뒤져 보니, wireguard-go를 VPP와 연동시키는 project가 보인다. 이 방법을 다시한번 시도해 보아야겠다. 😂

=> ubuntu 24.04 부터 kernel source를 내려 받는 방법이 좀 바뀌었다.
=> 얘를 수행하면 에러가 발생하는데, 무시해도 된다.
libudev-dev libpci-dev libiberty-dev autoconf llvm build-essential libncurses5-dev gcc bc dwarves
$ sudo apt-get update
$ sudo su
# apt source linux-image-unsigned-$(uname -r)
=> linux kernel source를 내려 받는다.
# ls -l
drwxr-xr-x 29 root root 4096 Jun 20 14:02 linux-6.8.0
-rw-r--r-- 1 root root 1616761 May 23 20:58 linux_6.8.0-35.35.diff.gz
-rw-r--r-- 1 root root 9267 May 23 20:58 linux_6.8.0-35.35.dsc
-rw-r--r-- 1 root root 230060117 Mar 15 15:29 linux_6.8.0.orig.tar.gz
# cd linux-6.8.0
# chmod a+x debian/scripts/*
# chmod a+x -R ./scripts
=> ubuntu server의 kernel config를 복사해 온다.
# make oldconfig
# make -j4
=> 상당한 시간이 경과한 후, 결국 build되었다.


drivers/net/wireguard/
chyi@vppbox:~/workspace/ubuntu/linux-6.8.0/drivers/net/wireguard$ ls -l /lib/modules/6.8.4/kernel/drivers/net/wireg
uard/
total 12236
-rw-r--r-- 1 root root 6318560 Jun 22 08:32 wireguard.ko
-rw-r--r-- 1 root root 6208945 Jun 22 07:07 wireguard.ko.ORIG
wireguard 118784 0
curve25519_x86_64 36864 1 wireguard
libchacha20poly1305 16384 1 wireguard
libcurve25519_generic 49152 2 curve25519_x86_64,wireguard
ip6_udp_tunnel 16384 1 wireguard
udp_tunnel 32768 1 wireguard
- lcp create 명령을 사용하여 physical interface(TwoDotFiveGigabitEthernet1/0/0, TwoDotFiveGigabitEthernet4/0/0)에 상응하는 Linux host 쪽 virtual interface(eth0, eth3)를 생성한다.
- l2 wireguard는 LAN 쪽(eth0)에서 bridge에 추가되어야 한다.
- LAN 쪽에 bridge(bvi0) interface를 하나 만들고, TwoDotFiveGigabitEthernet1/0/0, tap1(eth0과 연결되는 tap interface) interface를 bridge에 포함시킨다. 즉, bridge bvi0 = { TwoDotFiveGigabitEthernet1/0/0 + tap1 } 형태가 되도록 ...
- linux host에서는 brctl을 이용하여 br-lan interface를 하나 만들고, 여기에 eth0와 wg1(l2 wireguard)를 추가시킨다. 즉, br-lan = { eth0 + wg1 }
- 2번의 bridge 생성 과정을 통해 최종 bridge = { TwoDotFiveGigabitEthernet1/0/0 + tap1 + eth0 + wg1 }가 완성되고, bridge를 통해 l2 wireguard 자연스럽게 구동된다.
.png)

# set int state TwoDotFiveGigabitEthernet4/0/0 up
# set int ip address TwoDotFiveGigabitEthernet1/0/0 192.168.3.1/24
# set int ip address TwoDotFiveGigabitEthernet4/0/0 192.168.8.134/24
# lcp create TwoDotFiveGigabitEthernet1/0/0 host-if eth0
# lcp create TwoDotFiveGigabitEthernet4/0/0 host-if eth3
# lcp lcp-sync on
# bvi create instance 0
# set int l2 bridge bvi0 1 bvi
# set int state bvi0 up
=> l2 bridge interface bvi0를 생성한다.
# set int l2 bridge TwoDotFiveGigabitEthernet1/0/0 1
# set int l2 bridge tap1 1
=> bridge interface에 TwoDotFiveGigabitEthernet1/0/0와 tap1을 추가한다.
=> curve25519 keypair를 생성한다.
=> l2wireguard를 지정해 주어야 ethernet frame을 통째로 tunneling할 수 있다.
=> l2 wireguard의 경우는 ethernet device 형태이기 때문에 MAC 주소를 반드시 지정해 주어야 한다.
=> l2 wireguard interface를 up시킨다.
$ sudo brctl delbr br-lan
=> 기존에 설정되어 있는 br-lan bridge interface를 내린다.
$ sudo ifconfig wg1 0.0.0.0
=> bridge에 포함시킬 interface의 ip 주소를 없앤다. openwrt의 경우 eth0은 LAN interface임.
$ sudo brctl addif br-lan eth0
$ sudo brctl addif br-lan wg1
=> br-lan interface를 새로 생성하고, eth0과 wg1 interface를 bridge에 포함시킨다.
$ brctl stp br-lan 1
=> bridge interface를 up 시킨다.
Name Idx State MTU (L3/IP4/IP6/MPLS) Counter Count
TwoDotFiveGigabitEthernet1/0/0 1 up 9000/0/0/0 tx-error 1
TwoDotFiveGigabitEthernet4/0/0 2 up 9000/0/0/0 rx packets 3
rx bytes 310
tx packets 5
tx bytes 500
drops 1
ip4 1
tx-error 2
bvi0 5 up 9000/0/0/0 rx packets 1
rx bytes 76
drops 1
ip6 1
local0 0 down 0/0/0/0 drops 1
tap1 3 up 9000/0/0/0 rx packets 1
rx bytes 90
drops 1
tap2 4 up 9000/0/0/0 rx packets 5
rx bytes 530
tx packets 2
tx bytes 250
drops 1
ip4 1
ip6 3
wg1: flags=4163<UP,BROADCAST,RUNNING,MULTICAST> mtu 1406
ether 00:e0:1d:6b:bb:47 txqueuelen 1000 (Ethernet)
RX packets 181630 bytes 240785636 (240.7 MB)
RX errors 0 dropped 0 overruns 0 frame 0
TX packets 49164 bytes 6296094 (6.2 MB)
TX errors 363 dropped 0 overruns 0 carrier 0 collisions 0
Kernel IP routing table
Destination Gateway Genmask Flags MSS Window irtt Iface
0.0.0.0 192.168.8.1 0.0.0.0 UG 0 0 0 eth3
192.168.8.0 0.0.0.0 255.255.255.0 U 0 0 0 eth3
192.168.10.0 0.0.0.0 255.255.255.0 U 0 0 0 enp3s0
interface: wg1
public key: NVC/buWHbT9ZU7OgObohA2aX2KtuRUknYTOv5Z7PGAc=
private key: (hidden)
listening port: 51820
peer: jkOW74X1CRS8fobzmYYPGDkyVhR5rdEa9uh8QA2O/0k=
endpoint: 192.168.8.182:51820
allowed ips: 0.0.0.0/0
latest handshake: 39 seconds ago
transfer: 229.63 MiB received, 6.00 MiB sent
____________________________________________________________________________________
<nanopi r2s plus>
=> curve25519 keypair를 생성한다.
=> l2wireguard를 지정해 주어야 ethernet frame을 통째로 tunneling할 수 있다.
NVC/buWHbT9ZU7OgObohA2aX2KtuRUknYTOv5Z7PGAc= allowed-ips 0.0.0.0/0 endpoint 192.168.8.134:51820
=> device 및 peer 설정을 한다. allowed-ips는 반드시 0.0.0.0/0으로 지정한다.
=> wg1 interface에 대해 MAC address를 설정한다. 회사마다 고유의 MAC 주소 대역이 있으므로, 이를 활용하도록 하자.
=> wg1 interface를 link up 시킨다.
# brctl delbr br-lan
=> 기존에 설정되어 있는 br-lan bridge interface를 내린다.
# ifconfig wg1 0.0.0.0
=> bridge에 포함시킬 interface의 ip 주소를 없앤다. openwrt의 경우 eth1은 LAN interface임.
# brctl addif br-lan eth1
# brctl addif br-lan wg1
=> br-lan interface를 새로 생성하고, eth1과 wg1 interface를 bridge에 포함시킨다.
=> 이렇게 설정해 주어야, 원격 dhcp가 정상 동작하게 된다(기존 설정을 유지).
=> bridge interface를 up 시킨다.
interface: wg1
public key: jkOW74X1CRS8fobzmYYPGDkyVhR5rdEa9uh8QA2O/0k=
private key: (hidden)
listening port: 51820
peer: NVC/buWHbT9ZU7OgObohA2aX2KtuRUknYTOv5Z7PGAc=
endpoint: 192.168.8.134:51820
allowed ips: 0.0.0.0/0
latest handshake: 1 minute, 29 seconds ago
transfer: 5.45 MiB received, 232.27 MiB sent


[ 2697.176491] device eth0 entered promiscuous mode
tcpdump: verbose output suppressed, use -v[v]... for full protocol decode
listening on eth0, link-type EN10MB (Ethernet), snapshot length 262144 bytes
17:22:14.677490 IP 192.168.8.134.51820 > 192.168.8.182.51820: UDP, length 256
17:22:15.584748 IP 192.168.8.182.51820 > 192.168.8.134.51820: UDP, length 32
17:22:15.681564 IP 192.168.8.134.51820 > 192.168.8.182.51820: UDP, length 256
17:22:16.689792 IP 192.168.8.134.51820 > 192.168.8.182.51820: UDP, length 256
17:22:16.839873 IP 192.168.8.134.51820 > 192.168.8.182.51820: UDP, length 112
_______________________________________________________
WireGuard® is a registered trademark of Jason A. Donenfeld.
May The Source Be With You
[2] https://ipng.ch/s/articles/2021/08/12/vpp-1.html
[3] https://ipng.ch/s/articles/2021/08/13/vpp-2.html
[4] https://ipng.ch/s/articles/2021/08/15/vpp-3.html
[5] https://ipng.ch/s/articles/2021/08/25/vpp-4.html
[6] https://github.com/pimvanpelt/vppcfg
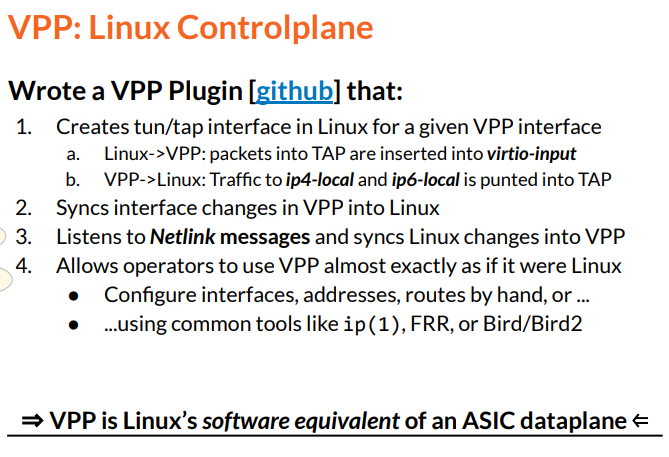
=> vpp linux control plane 관련 내용
=> 4 ports intel appliance
[7] Zero Trust - Zero Trust Reference Architecture, Intel
=> ZTNA 관련
[8] https://davidaugustat.com/linux/how-to-compile-linux-kernel-on-ubuntu
[9] https://askubuntu.com/questions/1435591/correct-way-to-build-kernel-with-hardware-support-fix-patches-ubuntu-22-04-lts
[10] https://pak-j.tistory.com/65
=> Ubuntu linux kernel compilation 관련
[11] https://www.alibaba.com/product-detail/Mini-Computer-Router-Pfsense-intel-Celeron_1600520478252.html?spm=a2700.wholesale.0.0.15612aa8knw7RZ
=> Intel appliance
[12] https://www.intel.com/content/www/us/en/developer/articles/technical/build-a-fast-network-stack-with-vpp-on-an-intel-architecture-server.html
[13] https://bootlin.com/pub/conferences/2018/elc/belloni-switchdev/belloni-switchdev.pdf