Atmel(www.at91.com, www.atmel.com)에서 SAMA5D3 Xplained board를 하나 구입했다.
이번 blog에서는 SAMA5D3 Xplained board를 기반으로 OpenVPN 서버를 구축(on OpenWrt)하는 전 과정을 상세히 다루어 보고자 한다. 그 과정에서 u-boot, linux kernel, device tree 관련 주요 코드도 함께 소개해 보도록 하겠다.
<앞으로 소개할 내용>
1. Atmel SAMA5D3
board 소개
2. SAMA5D3 source download & build 하기
2.1 AT91 Bootstrap
2.2 U-boot bootloader
2.3 Linux kernel (with device tree)
2.4 Yocto build system
2.5 Buildroot build system
2.6 SAM-BA tool(firmware writer) 사용법 소개
2.5 Buildroot build system
2.6 SAM-BA tool(firmware writer) 사용법 소개
3. 주요 소스 코드 분석
3.1 u-boot bootloader
3.2 device tree
3.3 linux kernel(device drivers)
3.1 u-boot bootloader
3.2 device tree
3.3 linux kernel(device drivers)
4. OpenWrt source download & build 하기
4.1 OpenWrt build 방법 소개
4.2 SAMA5D3 NFS booting
4.3 SAMA5D3 NAND booting
5. OpenVPN Server porting
5.1 OpenVPN 소개
5.2 Server porting
5.3 동작 시험
5.1 OpenVPN 소개
5.2 Server porting
5.3 동작 시험
6. IoT Gateway or Sensor로 활용하기[시간이 된다면]
6.1 다양한 sensor를 붙여 보기(Python or C)
6.2 LTE를 이용한 IoT Gateway 만들기
6.1 다양한 sensor를 붙여 보기(Python or C)
6.2 LTE를 이용한 IoT Gateway 만들기
오늘은 그 첫번째 시간으로 SAMA5D3 Xplained board를 가볍게 훑어 보기로 하자.
제 1 장. Atmel SAMA5D3 Xplained board 개요
아래 그림이 Atmel SAMA5D3 Xplained board가 되겠다.
<Atmel
SAMA5D3 Xplained board>
<SAMA5D3 Xplained board의 장점>
a) 최신 kernel을 사용하고 있으며, device tree를 지원한다.
b) 문서가 매우 잘 정리되어 있어 혼자서 따라하는데 전혀 무리가 없다.
c) build system으로 Yocto, BuildRoot가 모두 고려되어 있다.
d) SAM-BA라는 훌륭한 firmware image writing tool을 제공하고 있다.
(*) embedded linux를 master하고 싶은 독자라면 강추하고 싶다. 👍
high performance portable handheld applications such as human-machine interfaces, control panels, smart grid infrastructures, network gateways, M2M systems, 2D barcode scanners, barcode printers, machine vision equipment, as well as home and commercial building automations, POS terminals, medical devices and white goods.위에는 언급되어 있지 않지만, 요즘 유행하는 IoT gateway로도 충분히 활용 가능하다.
하지만, 본 blog에서는 이런 영역보다는 SAMA5D3 board를 OpenVPN gateway(security gateway)로 활용해 보고자 한다. 그 이유는 현재 OpenVPN에 꽂혀(?) 있기 때문이다. 😎
또한, build system으로는 Atmel에서 기본적으로 소개하고 있는 Yocto나 BuildRoot 보다는 gateway 계의 android격이라고 할 수 있는 OpenWrt를 활용해 봄으로써, VPN, Firewall, Wi-Fi AP, LTE Router, Open vSwitch(OpenFlow) 등으로도 쉽게 전환가능하도록 해 볼 예정이다.
아래 그림은 SAMA5D3 Xplained board의 functional block도이다. 자세한 사항은 아래 원문을 참고하기 바란다.
The SAMA5D3 Xplained board is built around the SAMA5D36, a Cortex-A5 application processor which combines high-performance computing device with low-power consumption and a wide range of communication peripherals.
It features a combination of user interface functionalities and high data rate IOs, including LCD controller, touchscreen, camera interface, Gigabit and 10/100 Ethernet ports, high-speed USB and SDIO.
The ARM Cortex-A5 supports the latest generation of DDR2 and NAND Flash memory interfaces for program and data storage. An internal 166-MHz multi-layer bus architecture associated with 24 DMA channels and two 64-Kbyte SRAM blocks, sustains the high bandwidth required by the processor and the high-speed peripherals.
<Atmel SAMA53 Xplained board block diagram>
부팅 순서는 아래와 같이 요약해 볼 수 있다. 즉, Boot ROM -> AT91 Bootstrap loader -> U-Boot bootloader -> Linux kernel 순으로 부팅이 진행된다.
<Boot Sequence>
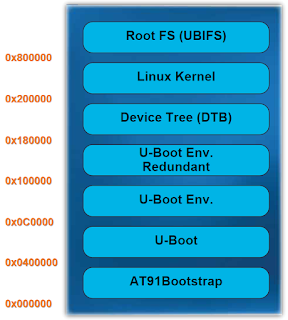
아래 그림은 NAND flash를 사용할 경우의 파티션 map과 NAND flash(nand flash로 국한하지는 않음)에 firmware image를 write할 때 사용하는 tool(SAM-BA)을 보여준다.
<NAND flash memory map>
<SAM-BA - firmware image writing tool>
부팅 sequence 및 NAND 파티션과 관련해서는 앞으로 소개할 3장에서 자세히 살펴 보기로 한다.
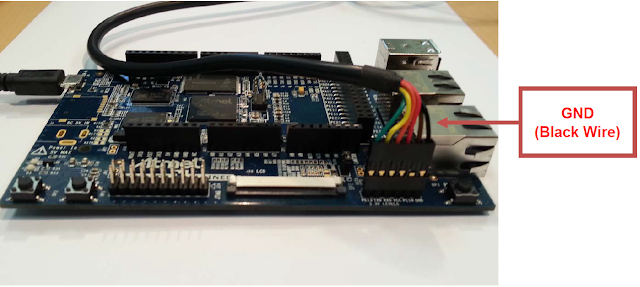
다음 그림은 SAMA5D3 Xplained board에 console 케이블을 연결한 모습 및 TeraTerm을 사용하여 실제로 target board에 login한 모습을 각각 보여준다.
<FTDI console cable 연결>
<TeraTerm 화면 - 115200, 8N1 설정>
SAMA5D3 Xplained board를 보다 자세히 이해하기 위해서는 회로도를 분석해 볼 필요가 있는데, 이와 관련해서는 아래 파일을 참조해 보시기 바란다(이 내용도 별도로 정리해 게재하고자 했으나, 저작권 문제가 있을 듯 보여 추가로 정리하지 않기로 함).
"Atmel_11269_32-bit-Cortex-A5-Microcontroller_SAMA5D3-Xplained_User-Guide.pdf"
마지막으로 SAMA5D3 Xplained board를 위한 Linux, Android, Windows 개발 page를 소개하고 첫번째 글을 마치고자 한다.
http://www.at91.com/android4sam/bin/view/Android4SAM/
http://www.at91.com/windows4sam/bin/view/Windows4SAM/
<References>
2. Atmel documents
- Atmel_11270_32-bit-Cortex-A5-Microcontroller_SAMA5D3-Xplained_Getting-Started.pdf
- Atmel_11269_32-bit-Cortex-A5-Microcontroller_SAMA5D3-Xplained_User-Guide.pdf
- Atmel_11121_32-bit-Cortex-A5-Microcontroller_SAMA5D3-Datasheet.pdf
Slowboot


안녕하세요!
답글삭제SAMA5D3 Xplained board 구매를 했습니다.
pc환경에서 프로그램 개발 환경을 구축하려고 합니다.
도움을 받았으면 합니다.
김종복 jbkim@sanesys.com
개발환경이 linux 인지, 보드설명을 잘 이해하기가 힘듭니다.
답글삭제도움을 꼭~좀 받을 수 있으면 좋겠습니다.
대단히 죄송합니다만,
답글삭제제가 작성한 SAMA5D3 Xplained board 관련 여러 blog posting 내용 중 궁금한 사항이 있으시다면, 답변을 드릴 수 있겠으나, "pc 환경에서 프로그램 개발 환경을 구축"과 같이 내용이 모호한 부분에 대해서는 도움을 드릴 수가 없을 듯 합니다.
1. PC 환경이 Windows를 말씀하시는 것이고, Windows CE 개발 환경이 필요하신 것이라면, 아래 site의 내용을 참조하셔야 할 듯 보이며,
http://www.at91.com/windows4sam/bin/view/Windows4SAM/
2. 그렇지 않은 경우(즉, Linux or Android)라면, 아래 site의 내용을 면밀히 검토해 보시길 권해 드립니다.
http://www.at91.com/linux4sam/bin/view/Linux4SAM <= Linux의 경우
http://www.at91.com/android4sam/bin/view/Android4SAM/ <= Android의 경우
(*) 개인적으로는 회사에 묶인 몸인지라, 원하시는 도움(아마도 consulting 형태)은 드리지 못할 것 같습니다. 이점 양해를 부탁드리겠습니다.
안녕하세요 혹시 sama5d3 xplained board 에서 랜카드 두개를 사용하여 이더넷 두개를 사용하려먼 어떻게 해야하는지 알고계신가해서 댓글 남깁니다..
삭제