UDOO Neo board + Docker + Android Marshmallow


1. UDOO Neo 보드 소개
2. Android Source Download & Build 하기
3. Docker 환경에서 Android Source Build 하기
4. Android UDOO Neo board 파일 분석 및 몇가지 Tips
5. UDOO Neo 보드 부팅하기
1. UDOO Neo 보드 소개
UDOO Neo 보드! 아주 독특하고 재밌는 concept의 보드다. 일반적인 SBC(Single Board Computer)와 달리 Application processor(Cortex-A9) + Arduino processor(Cortex-M4) 형태로 구성되어 있으며, Wi-Fi/Bluetooth 모듈과 3가지 센서(3-axis Accelerometer, Gyroscope, Magnetometer)가 장착되어 있는 것이 특징이다. 따라서 고성능(android 탑재 가능)을 지향하며, arduino compatible한 IoT 장비 개발에 적합한 보드로 보인다. 앞으로 Android Things project가 보다 구체화될 경우, android things용으로 활용해 보는 것도 괜찮을 것 같다.

그림 1.1 UDOO Neo 보드 개요
UDOO Neo 보드의 주요 특징을 원문 그대로 정리해 보면 다음과 같다.

그림 1.2 UDOO Neo 보드 구조(Top/bottom view)
2. Android Source Download & Build 하기
이번 절에서는 UDOO Neo 보드용 android source code(marshmallow)를 내려 받아 build하는 절차를 소개해 보고자 한다. 이는 앞으로 3절에서 설명하게 될 docker 환경이 필요한 이유를 보여주기 위해 필요한 사전 절차로 보면 될 듯하다.
<Java JDK 설치>
UDOO Neo용 android source code를 build하기 위해서는 openjdk 7이 필요하다.
$ sudo add-apt-repository ppa:openjdk-r/ppa
$ sudo apt-get update
$ sudo apt-get install openjdk-7-jdk
기존에 openjdk 8이 설치되어 있던 관계로, 특별히 아래와 같은 조치를 취해주어야 했다.
$ sudo update-alternatives --config java
=> /etc/alternatives/java의 symbol link를 open jdk7의 그것으로 바꿔주게 됨.
---------------------------------------------------------------------------------------------------------------------------
대체 항목 java에 대해 (/usr/bin/java 제공) 2개 선택이 있습니다.
선택 경로 우선순위 상태
---------------------------------------------------------------------------------------------------
* 0 /usr/lib/jvm/java-8-openjdk-amd64/jre/bin/java 1081 자동 모드
1 /usr/lib/jvm/java-7-openjdk-amd64/jre/bin/java 1071 수동 모드
2 /usr/lib/jvm/java-8-openjdk-amd64/jre/bin/java 1081 수동 모드
Press <enter> to keep the current choice[*], or type selection number: 1
update-alternatives: using /usr/lib/jvm/java-7-openjdk-amd64/jre/bin/java to provide /usr/bin/java (java) in manual mode
chyi@earth:~/IoT/UDOO/myandroid$ java -version
java version "1.7.0_95"
OpenJDK Runtime Environment (IcedTea 2.6.4) (7u95-2.6.4-3)
OpenJDK 64-Bit Server VM (build 24.95-b01, mixed mode)
---------------------------------------------------------------------------------------------------------------------------
$ sudo update-alternatives --config javac
$ sudo update-alternatives --config javap
$ sudo update-alternatives --config javadoc
$ sudo update-alternatives --config javah
<Android build 절차>
모든 환경이 준비되었으니, 이제 부터는 android source를 내려 받아 build를 해 보도록 하자.
$ cd UDOO/
$ mkdir myandroid
$ mkdir bin
$ curl http://commondatastorage.googleapis.com/git-repo-downloads/repo > ./bin/repo
$ chmod 755 repo ./bin/repo
$ cd myandroid/
$ ../bin/repo init -u https://github.com/UDOOboard/android_udoo_platform_manifest -b android-6.0.1
$ ../bin/repo sync -j5
$ export ARCH=arm
$ source build/envsetup.sh
including device/fsl/imx6/vendorsetup.sh
including device/fsl/imx7/vendorsetup.sh
including device/udoo/imx6/vendorsetup.sh
including sdk/bash_completion/adb.bash
$ lunch
You're building on Linux
Lunch menu... pick a combo:
1. aosp_arm-eng
2. aosp_arm64-eng
3. aosp_mips-eng
4. aosp_mips64-eng
5. aosp_x86-eng
6. aosp_x86_64-eng
7. sabresd_6dq-eng
8. sabresd_6dq-user
9. sabreauto_6q-eng
10. sabreauto_6q-user
11. evk_6sl-eng
12. evk_6sl-user
13. sabresd_6sx-eng
14. sabresd_6sx-user
15. sabreauto_6sx-eng
16. sabreauto_6sx-user
17. evk_6ul-eng
18. evk_6ul-user
19. sabresd_7d-eng
20. sabresd_7d-user
21. a62_6dq-eng
22. a62_6dq-user
23. udoo_6dq-eng
24. udoo_6dq-user
25. udooneo_6sx-eng
26. udooneo_6sx-user
Which would you like? [aosp_arm-eng] udooneo_6sx-eng
============================================
PLATFORM_VERSION_CODENAME=REL
PLATFORM_VERSION=6.0.1
TARGET_PRODUCT=udooneo_6sx
TARGET_BUILD_VARIANT=eng
TARGET_BUILD_TYPE=release
TARGET_BUILD_APPS=
TARGET_ARCH=arm
TARGET_ARCH_VARIANT=armv7-a-neon
TARGET_CPU_VARIANT=cortex-a9
TARGET_2ND_ARCH=
TARGET_2ND_ARCH_VARIANT=
TARGET_2ND_CPU_VARIANT=
HOST_ARCH=x86_64
HOST_OS=linux
HOST_OS_EXTRA=Linux-4.4.0-62-generic-x86_64-with-Ubuntu-16.04-xenial
HOST_BUILD_TYPE=release
BUILD_ID=6.0.1-beta2
OUT_DIR=out
============================================
$ make -j5
=> 중간에 에러가 계속 발생하여, 결국 build에 실패함.
=> 여러가지 시도를 해 보았으나, 아무래도 다른 방법을 찾아야 할 듯 보임.
UDOO NEO 보드용 android marshmallow source code는 Ubuntu 14.04에서는 검증(정상 build 확인)되었으나, 아무래도 Ubuntu 16.04에서는 그렇지 못한 듯하다(Android web page에도 14.04를 사용하도록 권고하고 있음). 따라서 Virtual Ubuntu 14.04 환경을 만들고 여기에서 build를 시도해 보는 것이 답일 듯 보인다. Virtual 환경으로는 Oracle VirtualBox가 매우 훌륭하지만, android가 워낙 방대한 크기를 자랑(?)하기 때문에 VirtualBox에서 android를 build하는 것은 좋은 선택이 아닐 듯 싶다(과거 경험상 이건 답이 아니다). 그렇다면 어찌해야 할까 ?
3. Docker 환경에서 Android Source Build 하기
이번 절에서는 Ubuntu 16.04 Host PC(64bit)에 docker를 설치하고, 다시 docker를 통해 Ubuntu 14.04 LTS(64bit)를 설치한 후 이 환경에서 android source code를 build하는 과정을 소개해 보고자 한다.

그림 3.1 docker container 아키텍쳐
<Docker 설치>
$ sudo apt-get update
=> 먼저 package database를 갱신하자.
$ sudo apt-key adv --keyserver hkp://p80.pool.sks-keyservers.net:80 --recv-keys 58118E89F3A912897C070ADBF76221572C52609D
=> 공식 docker 저장소(repository)를 위한 GPG key를 추가한다.
$ sudo apt-add-repository 'deb https://apt.dockerproject.org/repo ubuntu-xenial main'
=> APT source에 docker 저장소를 추가한다.
$ sudo apt-get update
=> 다시 package database를 갱신한다.
$ apt-cache policy docker-engine
=> ubuntu 저장소 대신에 docker 저장소로 부터 install 하도록 설정 변경한다.
$ sudo apt-get install -y docker-engine
=> (실제로) docker를 설치한다.
$ sudo systemctl status docker
=> 정상적으로 docker가 설치되었는지를 확인한다.
● docker.service - Docker Application Container Engine
Loaded: loaded (/lib/systemd/system/docker.service; enabled; vendor preset: enabled)
Active: active (running) since 목 2017-02-09 20:40:19 KST; 12s ago
Docs: https://docs.docker.com
Main PID: 10318 (dockerd)
Tasks: 19
Memory: 20.6M
CPU: 451ms
CGroup: /system.slice/docker.service
├─10318 /usr/bin/dockerd -H fd://
└─10328 docker-containerd -l unix:///var/run/docker/libcontainerd/docker-containerd.soc
2월 09 20:40:15 earth dockerd[10318]: time="2017-02-09T20:40:15.461308459+09:00" level=warning msg
2월 09 20:40:15 earth dockerd[10318]: time="2017-02-09T20:40:15.461755681+09:00" level=warning msg
2월 09 20:40:15 earth dockerd[10318]: time="2017-02-09T20:40:15.463056059+09:00" level=info msg="L
2월 09 20:40:16 earth dockerd[10318]: time="2017-02-09T20:40:16.014229231+09:00" level=info msg="F
2월 09 20:40:16 earth dockerd[10318]: time="2017-02-09T20:40:16.989395982+09:00" level=info msg="D
2월 09 20:40:18 earth dockerd[10318]: time="2017-02-09T20:40:18.859934895+09:00" level=info msg="L
2월 09 20:40:19 earth dockerd[10318]: time="2017-02-09T20:40:19.091618066+09:00" level=info msg="D
2월 09 20:40:19 earth dockerd[10318]: time="2017-02-09T20:40:19.091683685+09:00" level=info msg="D
2월 09 20:40:19 earth dockerd[10318]: time="2017-02-09T20:40:19.108524743+09:00" level=info msg="A
2월 09 20:40:19 earth systemd[1]: Started Docker Application Container Engine.
$ sudo usermod -aG docker $(whoami)
=> docker 명령 실행 시, sudo를 사용하지 않도록 하기 위해 docker group에 내 계정을 추가한다.
=> 이 상태에서 group 변경 사항을 반영하기 위해 logout -> login을 시도한다.
$ docker info
=> docker 정보를 출력해 본다.
$ docker run -it ubuntu:trusty /bin/bash
=> ubuntu 14.04(trusty)를 내려 받아 실행한다. 기본 shell 은 bash를 사용하도록 한다.
=> 참고: 위의 명령은 내부적으로 아래의 3개 명령(검색 -> download -> 실행)을 한번에 실행하는 것과 동일한 효과가 있다.
---------------------------------------
$ docker search ubuntu
$ docker pull ubuntu
$ docker run -it ubuntu
---------------------------------------
<docker login 상태>
=> 최초 ubuntu 14.04를 설치한 상태에서는 아무런 package가 설치되어 있지 않으므로, 아래의 절차를 따라 android build에 필요한 기본 package를 내려 받도록 한다.
# echo "debconf shared/accepted-oracle-license-v1-1 select true" | debconf-set-selections
# echo "debconf shared/accepted-oracle-license-v1-1 seen true" | debconf-set-selections
# apt-get update
# apt-get install git git-core gnupg flex bison gperf build-essential zip curl zlib1g-dev gcc-multilib g++-multilib libc6-dev-i386 lib32ncurses5-dev x11proto-core-dev libx11-dev lib32z-dev ccache libgl1-mesa-dev libxml2-utils xsltproc unzip
# apt-get install openjdk-7-jdk
=> android marshmallow는 openjdk 7이 필요하다.
# apt-get install uuid uuid-dev lzop liblz-dev iblzo2-dev u-boot-tools mtd-utils android-tools-fsutils
# exit
참고: 위의 내용은 추후 dockerfile로 구성해 볼 필요가 있겠음.
$ docker commit -m "android_env_for_udoo" -a "Chunghan Yi" dc26188cb1c2 chyi/udoo
=> 여기까지 수정한 사항을 일단 commit하도록 하자. 이는 마치 git으로 변경 사항을 commit하는 과정과 유사해 보임.
=> dc26188cb1c2는 "docker run -it ubuntu:trusty /bin/bash" 실행시 출력되는 값임.
=> 이 commit 과정을 진행하지 않을 경우, 다음 번 login 시 위에서 설치한 모든 내용을 잃게 됨.
$ docker images
=> 앞서 commit하여 새로 생성된 docker image를 확인해 보도록 한다.
REPOSITORY TAG IMAGE ID CREATED SIZE
chyi/udoo latest f522c08dd2b8 12 seconds ago 763 MB
ubuntu latest f49eec89601e 2 weeks ago 129 MB
ubuntu trusty b969ab9f929b 2 weeks ago 188 MB
hello-world latest 48b5124b2768 3 weeks ago 1.84 kB
bprodoehl/android-dev latest 718567bb2723 2 years ago 7.95 GB
$ docker run -it chyi/udoo /bin/bash
=> 다시 ubuntu를 실행한다. 이번에는 ubuntu:trusty 대신 chyi/udoo를 입력함.
<docker login 상태 : android source download>
=> android source를 download하도록 하자.
# cd /home
# mkdir myandroid bin
# cd bin
# curl http://commondatastorage.googleapis.com/git-repo-downloads/repo > ./repo
# chmod 755 repo
# cd ../myandroid
# /home/bin/repo init -u https://github.com/UDOOboard/android_udoo_platform_manifest -b android-6.0.1
# /home/bin/repo sync -j5
=> 무지 오래 걸림(3 ~ 4시간 소요)
# exit
$ docker commit -m "android_source_for_udoo" -a "Chunghan Yi" c9dd472c7995 chyi/udoo
=> 여기까지 수정한 내용을 다시 commit한다.
$ docker images
REPOSITORY TAG IMAGE ID CREATED SIZE
chyi/udoo latest 024eb43eb4b5 38 minutes ago 40.8 GB
ubuntu latest f49eec89601e 2 weeks ago 129 MB
ubuntu trusty b969ab9f929b 2 weeks ago 188 MB
hello-world latest 48b5124b2768 3 weeks ago 1.84 kB
bprodoehl/android-dev latest 718567bb2723 2 years ago 7.95 GB
$ docker run -it chyi/udoo /bin/bash
<docker login 상태 : android source build>
=> build를 시도해 보도록 하자.
root@4f33ac3a0170:/home/myandroid# export ARCH=arm
root@4f33ac3a0170:/home/myandroid# source build/envsetup.sh
including device/fsl/imx6/vendorsetup.sh
including device/fsl/imx7/vendorsetup.sh
including device/udoo/imx6/vendorsetup.sh
including sdk/bash_completion/adb.bash
root@4f33ac3a0170:/home/myandroid# lunch
You're building on Linux
Lunch menu... pick a combo:
1. aosp_arm-eng
2. aosp_arm64-eng
3. aosp_mips-eng
4. aosp_mips64-eng
5. aosp_x86-eng
6. aosp_x86_64-eng
7. sabresd_6dq-eng
8. sabresd_6dq-user
9. sabreauto_6q-eng
10. sabreauto_6q-user
11. evk_6sl-eng
12. evk_6sl-user
13. sabresd_6sx-eng
14. sabresd_6sx-user
15. sabreauto_6sx-eng
16. sabreauto_6sx-user
17. evk_6ul-eng
18. evk_6ul-user
19. sabresd_7d-eng
20. sabresd_7d-user
21. a62_6dq-eng
22. a62_6dq-user
23. udoo_6dq-eng
24. udoo_6dq-user
25. udooneo_6sx-eng
26. udooneo_6sx-user
Which would you like? [aosp_arm-eng] 25
root@4f33ac3a0170:/home/myandroid# make -j5
=> kernel build 시 bc가 없어서 에러 발생함.
# apt-get install bc
=> kernel compile시 에러 발생하여 설치
root@4f33ac3a0170:/home/myandroid# make -j5
=> 다시 build 시도 !
=> kernel에서 또 다른 error 발생, 아무래도 얘네(udoo.org)가 뭔가 잘못 만들어 배포하는 느낌 :(
...
CC [M] backports/drivers/net/wireless/ti/wl18xx/event.o
LD [M] backports/drivers/net/wireless/ti/wl18xx/wl18xx.o
fatal: Not a git repository (or any of the parent directories): .git
CHK backports/drivers/net/wireless/ti/wlcore/version.h
UPD backports/drivers/net/wireless/ti/wlcore/version.h
CC [M] backports/drivers/net/wireless/ti/wlcore/main.o
arm-eabi-gcc: error: backports/drivers/net/wireless/ti/wlcore/main.c: No such file or directory
arm-eabi-gcc: fatal error: no input files
compilation terminated.
make[6]: *** [backports/drivers/net/wireless/ti/wlcore/main.o] Error 1
make[5]: *** [backports/drivers/net/wireless/ti/wlcore] Error 2
make[4]: *** [backports/drivers/net/wireless/ti] Error 2
make[3]: *** [backports/drivers/net/wireless] Error 2
make[2]: *** [backports] Error 2
make[1]: *** [sub-make] Error 2
make: *** [kernelmodules] Error 2
#### make failed to build some targets (03:48 (mm:ss)) ####
---------------------------------------------------------------
# cd kernel_imx
# make mrproper
=> kernel build에 에러가 발생할 이유가 전혀 없는데, 실제 발생하고 있음.
=> distclean 해 보기로 함.
# cd ..
# make -j5
=> 다시 build 시도했으나, (kernel 문제는 해결되었으나) 다른 error 발생
...
Install: out/host/linux-x86/framework/jack.jar
out/host/linux-x86/bin/jack-admin: line 27: USER: unbound variable
make: *** [out/host/linux-x86/framework/jack.jar] Error 1
make: *** Deleting file `out/host/linux-x86/framework/jack.jar'
----------------------------------------------------------------
# export USER=$(whoami)
=> docker에서 build할 경우 반드시 설정해 주어야 함.
=> 다시 build 시도 !
# make -j8 2>&1 | tee myresult.txt
=> 에러 원인을 찾기 위해 error 내용을 myresult.txt로 남기도록 함.
=> 다른 에러가 계속 발생함 .... 결국 해결 안됨 ...
=> 혹시나 하여 user mode로 build해 보기로 함.
root@4f33ac3a0170:/home/myandroid# lunch
You're building on Linux
Lunch menu... pick a combo:
1. aosp_arm-eng
2. aosp_arm64-eng
3. aosp_mips-eng
4. aosp_mips64-eng
5. aosp_x86-eng
6. aosp_x86_64-eng
7. sabresd_6dq-eng
8. sabresd_6dq-user
9. sabreauto_6q-eng
10. sabreauto_6q-user
11. evk_6sl-eng
12. evk_6sl-user
13. sabresd_6sx-eng
14. sabresd_6sx-user
15. sabreauto_6sx-eng
16. sabreauto_6sx-user
17. evk_6ul-eng
18. evk_6ul-user
19. sabresd_7d-eng
20. sabresd_7d-user
21. a62_6dq-eng
22. a62_6dq-user
23. udoo_6dq-eng
24. udoo_6dq-user
25. udooneo_6sx-eng
26. udooneo_6sx-user
Which would you like? [aosp_arm-eng] 26
# make -j8 2>&1 | tee myresult3.txt
=> 헐, user mode로는 정상 build 됨. :(
<build 결과물 확인>
root@4f33ac3a0170:/home/myandroid/out/target/product/udooneo_6sx# ls -l
total 535112
-rw-r--r-- 1 root root 14 Feb 10 08:04 android-info.txt
-rw-r--r-- 1 root root 6665511 Feb 10 08:09 boot-imx6sx.img
-rw-r--r-- 1 root root 6665511 Feb 10 08:09 boot.img
-rw-r--r-- 1 root root 64231 Feb 10 08:02 clean_steps.mk
drwxr-xr-x 3 root root 4096 Feb 10 08:04 dex_bootjars
drwxr-xr-x 2 root root 4096 Feb 10 07:05 fake_packages
drwxr-xr-x 5 root root 4096 Feb 10 07:53 gen
-rwxr-xr-x 1 root root 46438 Feb 10 08:05 imx6sx-udoo-neo-full-hdmi-m4.dtb
-rw-r--r-- 1 root root 88925 Feb 10 08:11 installed-files.txt
-rwxr-xr-x 1 root root 5703088 Feb 10 08:05 kernel
drwxr-xr-x 18 root root 4096 Feb 10 08:11 obj
-rw-r--r-- 1 root root 548 Feb 10 08:02 previous_build_config.mk
-rw-r--r-- 1 root root 4655650 Feb 10 08:10 ramdisk-recovery.img
-rw-r--r-- 1 root root 910938 Feb 10 08:09 ramdisk.img
drwxr-xr-x 3 root root 4096 Feb 10 08:04 recovery
-rw-r--r-- 1 root root 10411308 Feb 10 08:10 recovery-imx6sx.img
-rw-r--r-- 1 root root 67 Feb 10 08:10 recovery.id
-rw-r--r-- 1 root root 10411308 Feb 10 08:10 recovery.img
drwxr-xr-x 10 root root 4096 Feb 10 08:09 root
drwxr-xr-x 6 root root 4096 Feb 10 07:06 symbols
drwxr-xr-x 14 root root 4096 Feb 10 08:10 system
-rw-r--r-- 1 root root 501625152 Feb 10 08:11 system.img
-rwxr-xr-x 1 root root 332440 Feb 10 05:31 u-boot-imx6sx.imx
-rw-r--r-- 1 root root 332440 Feb 10 05:31 u-boot.imx
root@4f33ac3a0170:/home/myandroid/out/target/product/udooneo_6sx# exit
exit
chyi@earth:~$ docker commit -m "android_marshmallow_build_user_mode_done" -a "Chunghan Yi" 4f33ac3a0170 chyi/udoo
=> 지금까지 수정한 내용 commit 함.
chyi@earth:~$ docker images
REPOSITORY TAG IMAGE ID CREATED SIZE
chyi/udoo latest d3560a597201 About a minute ago 61.7 GB
ubuntu latest f49eec89601e 2 weeks ago 129 MB
ubuntu trusty b969ab9f929b 2 weeks ago 188 MB
hello-world latest 48b5124b2768 3 weeks ago 1.84 kB
bprodoehl/android-dev latest 718567bb2723 2 years ago 7.95 GB
4. Android UDOO Neo board 파일 분석 및 몇가지 Tips
먼저 원할한 source code 분석을 위해 (docker image 내에) ssh server와 사용자 계정을 추가하도록 하자.
<첫번째 terminal>
root@1046ecb38863:~# apt-get install ssh
root@1046ecb38863:~# /etc/init.d/ssh restart
root@1046ecb38863:~# adduser test1
...
$ docker commit -m "add new user" -a "Chunghan Yi" 1046ecb38863 chyi/udoo
$ docker run -it chyi/udoo /bin/bash
<다른 terminal에서 접속>
chyi@earth:~$ ssh test1@172.17.0.2
<udoo neo board 관련 파일>

그림 4.1 device/udoo/imx6/soc/imx6sx.mk file
root@af1bc3d5c3f1:~/myandroid/device/udoo/udooneo_6sx# ls -la
total 72
drwxr-xr-x 4 root root 4096 Feb 13 05:32 .
drwxr-xr-x 11 root root 4096 Feb 13 04:53 ..
-rw-r--r-- 1 root root 227 Feb 9 15:43 AndroidBoard.mk
-rw-r--r-- 1 root root 6486 Feb 9 15:43 BoardConfig.mk
-rw-r--r-- 1 root root 4172 Feb 9 15:43 audio_effects.conf
-rw-r--r-- 1 root root 3430 Feb 9 15:43 audio_policy.conf
drwxr-xr-x 2 root root 4096 Feb 9 15:43 bluetooth
-rw-r--r-- 1 root root 854 Feb 9 15:43 build_id.mk
-rw-r--r-- 1 root root 1711 Feb 10 08:01 fstab.freescale
-rw-r--r-- 1 root root 1711 Feb 9 15:43 fstab_sd.freescale
-rwxr-xr-x 1 root root 10738 Feb 9 15:43 init.rc
drwxr-xr-x 4 root root 4096 Feb 9 15:43 overlay
-rw-r--r-- 1 root root 690 Feb 9 15:43 twrp.mk
-rw-r--r-- 1 root root 163 Feb 9 15:43 uEnv.txt

그림 4.2 device/udoo/udooneo_6sx/BoardConfig.mk 내용 중 일부 발췌

그림 4.3 device/udoo/udooneo_6sx/init.rc 내용 중 일부 발췌
이 밖에도 device 디렉토리 내에는 udoo neo board 관련 다양한 board 설정 관련 파일이 존재한다. 편의상 이부분에 관한 추가 분석은 독자 여러분의 몫으로 남긴다.
다음으로 linux kernel과 bootloader(u-boot)를 단독으로 build하는 절차를 정리해 보기로 하겠다. (당연한 얘기지만) 이 방법이 필요한 이유는 android 전체를 build하는 시간이 매우 오래 걸리므로 linux kernel과 bootloader는 개별적으로 build하는 것이 보다 효율적이기 때문이다.
<u-boot bootloader build 절차>
=> build/core/Makefile을 참조하여 다시 작성함.
# export ARCH=arm
# export CROSS_COMPILE=`pwd`/prebuilts/gcc/linux-x86/arm/arm-eabi-5.3/bin/arm-eabi-
# export O=`pwd`/out/target/product/udooneo_6sx/obj/UBOOT_OBJ
# export PRODUCT_OUT=`pwd`/out/target/product/udooneo_6sx
# make -C bootable/bootloader/uboot-imx distclean
# export ARCH=arm
# export CROSS_COMPILE=`pwd`/prebuilts/gcc/linux-x86/arm/arm-eabi-5.3/bin/arm-eabi-
# export O=`pwd`/out/target/product/udooneo_6sx/obj/UBOOT_OBJ
# export PRODUCT_OUT=`pwd`/out/target/product/udooneo_6sx
# make -C bootable/bootloader/uboot-imx distclean
=> dist clean
# make -C bootable/bootloader/uboot-imx udoo_neo_android_defconfig
=> udoo neo android configuration 초기화
# make -C bootable/bootloader/uboot-imx
=> u-boot build를 시도한다.
<u-boot-imx6sx.imx 생성 절차>
# dd if=$(O)/SPL of=$(PRODUCT_OUT)/u-boot.imx bs=1K seek=0 conv=notrunc
# dd if=$(O)/u-boot.img of=$(PRODUCT_OUT)/u-boot.imx bs=1K seek=68
# cp $(PRODUCT_OUT)/u-boot.imx $(PRODUCT_OUT)/u-boot-imx6sx.imx
<linux kernel build 절차>
# export ARCH=arm
# export CROSS_COMPILE=`pwd`/prebuilts/gcc/linux-x86/arm/arm-eabi-5.3/bin/arm-eabi-
# export O=`pwd`/out/target/product/udooneo_6sx/obj/KERNEL_OBJ
# export PRODUCT_OUT=`pwd`/out/target/product/udooneo_6sx
# make -C kernel_imx udoo_neo_android_defconfig LOADADDR=0x80008000
=> kernel config(udoo_neo_android_defconfig) 초기화
# make -C kernel_imx -j4 uImage LOADADDR=0x80008000
=> uImage 생성(build)
# make -C kernel_imx dtbs LOADADDR=0x80008000
=> dtb file 생성
# make -C kernel_imx modules LOADADDR=0x80008000
=> kernel module build
<output file 생성 절차>
# export ARCH=arm
# export CROSS_COMPILE=`pwd`/prebuilts/gcc/linux-x86/arm/arm-eabi-5.3/bin/arm-eabi-
# export O=`pwd`/out/target/product/udooneo_6sx/obj/KERNEL_OBJ
# export PRODUCT_OUT=`pwd`/out/target/product/udooneo_6sx
# make -C kernel_imx udoo_neo_android_defconfig LOADADDR=0x80008000
=> kernel config(udoo_neo_android_defconfig) 초기화
# make -C kernel_imx -j4 uImage LOADADDR=0x80008000
=> uImage 생성(build)
# make -C kernel_imx dtbs LOADADDR=0x80008000
=> dtb file 생성
# make -C kernel_imx modules LOADADDR=0x80008000
=> kernel module build
<output file 생성 절차>
# cp $(O)/arch/arm/boot/zImage $(PRODUCT_OUT)/kernel
# cp $(O)/arch/arm/boot/dts/imx6sx-udoo-neo-full-hdmi-m4.dtb $(PRODUCT_OUT)/imx6sx-udoo-neo-full-hdmi-m4.dtb
개별적으로 kernel을 build하는 절차를 살펴 보았으니, 이제부터는 boot.img를 분해 & 신규 생성하는 절차를 살펴 보도록 하자. 이와 관련한 보다 자세한 사항은 (좀 오래된 내용이기는 하나 본 blogger의)아래 문서를 참조하기 바란다.
https://github.com/ChunghanYi/linux_kernel_hacks/blob/master/android_kernel_hacks/AndroidKernelHacks_Chapter1.pdf
<boot.img 분해하기>
# cd out/target/product/udooneo_6sx# device/udoo/common/tools/split_bootimg.pl ./boot.img
Page size: 2048 (0x00000800)
Kernel size: 5703088 (0x005705b0)
Ramdisk size: 910938 (0x000de65a)
Second size: 46438 (0x0000b566)
Board name:
Command line: console=ttymxc0,115200 init=/init vmalloc=256M androidboot.console=ttymxc0 consoleblank=0 androidboot.hardware=freescale cma=128M androidboot.selinux=disabled androidboot.dm_verity=disabled no_console_suspend uart_from_osc clk_ignore_unused
Writing boot.img-kernel ... complete.
Writing boot.img-ramdisk.gz ... complete
# ls -l
total 13024
-rw-r--r-- 1 root root 6665511 Feb 13 05:22 boot.img
-rw-r--r-- 1 root root 5703088 Feb 13 05:22 boot.img-kernel
=> linux kernel image(zImage)
-rw-r--r-- 1 root root 910938 Feb 13 05:22 boot.img-ramdisk.gz
=> ramdisk rootfs
-rw-r--r-- 1 root root 46438 Feb 13 05:22 boot.img-second.gz
=> boot.img 맨 끝 영역
<ramdisk rootfs file 분해/생성하기>
# gzip -d boot.img-ramdisk .gz
# cpio -i < ./boot.img-ramdisk

그림 4.4 ramdisk rootfs 디렉토리 구성
<ramdisk 내용 수정 후, ramdisk file 다시 묶기>
# find . | cpio –o –H newc | gzip > ../newramdisk .cpio.gz
<boot.img 생성하기>
# out/host/linux-x86/bin/mkbootimg \
--cmdline "console=ttymxc0,115200 init=/init vmalloc=256M androidboot.console=ttymxc0 consoleblank=0 androidboot.hardware=freescale cma=128M androidboot.selinux=disabled androidboot.dm_verity=disabled no_console_suspend uart_from_osc clk_ignore_unused” \
--kernel zImage \
--ramdisk newramdisk .cpio.gz \
--base 0x84800000 \
-o boot.img
(*) 참고: --base 0x84800000 값은 device/udoo/imx6/soc/imx6sx.mk 파일 내의 BOARD_KERNEL_BASE 값을 사용해야 한다.
5. UDOO Neo 보드 부팅하기
UDOO Neo 보드가 (4일만에) 도착했다. :) 이번 절에서는 앞서 build한 android image를 확인하기에 앞서 udoobuntu OS image가 어찌 동작하는지를 먼저 확인해 본 후, android image를 돌려 보도록 하겠다.5.1 Udoobuntu 이미지로 부팅하기
$ unzip udoobuntu-udoo-neo-desktop_2.1.2.zip
$ sudo dd if=./udoobuntu-udoo-neo-desktop_2.1.2.img of=/dev/sdb bs=1M
2772+0 레코드 들어옴
2772+0 레코드 나감
2906652672 bytes (2.9 GB, 2.7 GiB) copied, 574.938 s, 5.1 MB/s
$ sudo sync
(참고 사항) Udoobuntu는 그 이름에서도 알 수 있듯이 UDOO 보드용 Ubuntu를 의미하는데, Udoobuntu image를 생성하기 위해서는 아래의 명령을 사용하면 된다.
$ git clone https://github.com/UDOOboard/mkudoobuntu.git
$ cd mkudobuntu
$ sudo ./mkudoobuntu.sh udoo-neo desktop
=> mkudoobuntu.sh script는 내부적으로 armbian project의 debootstrap 명령을 사용하여 ubuntu image를 만들어 낸다(예: sudo debootstrap --arch=armhf --foreign $distro $targetdir)
=> u-boot, kernel 등도 build하여 생성한다.
-------------------------------------------------------------------------------------------------------------------------------------------
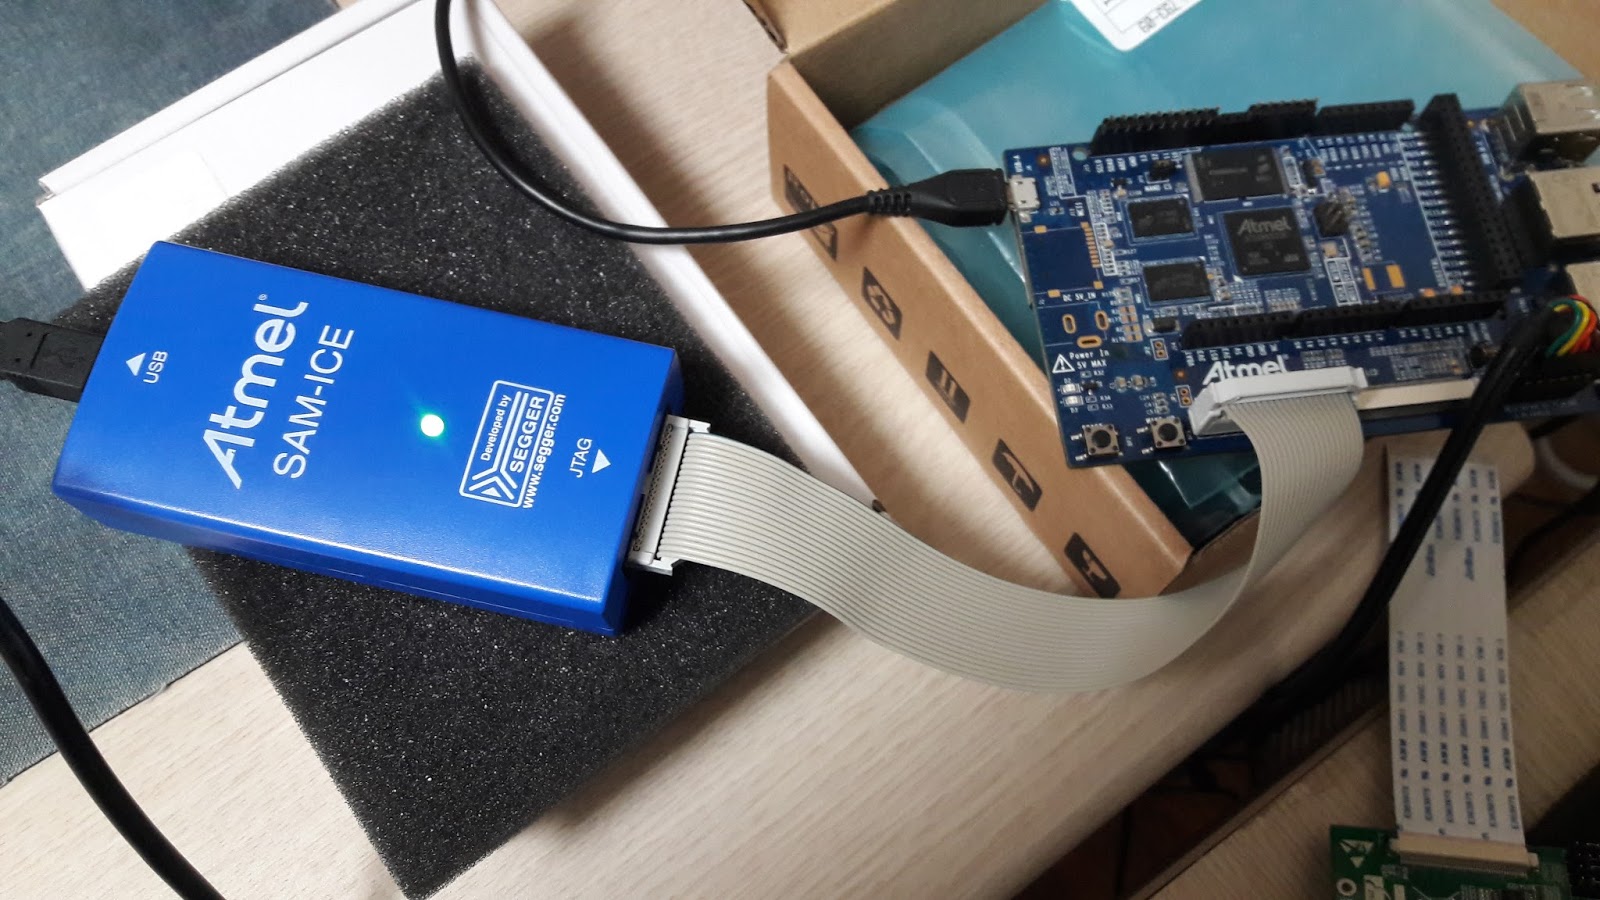
정상적으로 image writing이 완료되었다면, microSD 카드를 보드에 삽입한 후, 전원(DC 12V/2A or USB Wall Charger 5V with Micro USB Data Cable)을 인가하도록 하자.

그림 5.1 UDOO Neo 보드 연결 모습

그림 5.2 UDOO Neo 콘솔 부팅 모습(115200, 8N1)
콘솔 로긴 후, ethernet port에 대해 ip 주소(예: 192.168.1.2)를 강제로 지정하고, chrome browser로 웹 접속을 시도해 보자.

그림 5.3 UDOO Neo 보드 웹 UI 화면
아래 그림은 UDOO Neo 보드 웹 UI 화면 중, 아두이노 코딩을 위한 page(이번에는 Wi-Fi로 할당받은 주소로 접속을 시도함)를 보여준다.

그림 5.4 UDOO Neo 보드 웹 UI - Arduino 코딩 화면
UDOO Neo 웹 화면에서는 아래 그림과 같이 console terminal을 직접 띄울 수도 있다.

그림 5.5 UDOO Neo 보드 웹 UI - Remote Terminal 화면
5.2 Android 이미지로 부팅하기
자, 그럼 이제부터는 3절에서 build하여 얻은 android image를 설치해 볼 차례이다.
$ docker run -it chyi/udoo /bin/bash
=> docker로 ubuntu를 시작한다.
<Docker Guest OS>
root@9867b222a162:/home/myandroid# ./prepare_distro.sh mydroid
=> udoo.org에서 제공하는 prepare_distro.sh 파일을 통해 mydroid.tar.gz file을 만들도록 한다.
Distro Name selected: mydroid
'out/target/product/udooneo_6sx/u-boot.imx' -> 'mydroid/u-boot.imx'
'out/target/product/udooneo_6sx/boot.img' -> 'mydroid/boot.img'
'out/target/product/udooneo_6sx/recovery.img' -> 'mydroid/recovery.img'
'make_sd.sh' -> 'mydroid/make_sd.sh'
'README_make_uSD.txt' -> 'mydroid/README_make_uSD.txt'
'README_compile_Android.txt' -> 'mydroid/README_compile_Android.txt'
mydroid/
mydroid/u-boot.imx
mydroid/boot.img
mydroid/README_make_uSD.txt
mydroid/make_sd.sh
mydroid/README_compile_Android.txt
mydroid/system_raw.img
mydroid/recovery.img
root@9867b222a162:/home/myandroid# scp ./mydroid.tar.gz chyi@172.17.0.1:~/IoT/UDOO/images/mine
=> scp를 사용하여 mydroid.tar.gz 파일을 Host OS로 복사한다.
The authenticity of host '172.17.0.1 (172.17.0.1)' can't be established.
ECDSA key fingerprint is 99:ef:ce:37:39:7f:7e:7d:7b:f0:cf:bb:ca:2b:be:93.
Are you sure you want to continue connecting (yes/no)? yes
Warning: Permanently added '172.17.0.1' (ECDSA) to the list of known hosts.
...
--------------------------------------------------------------------
<Host OS>
$ docker commit -m "create mydroid.tar.gz" -a "Chunghan Yi" 9867b222a162 chyi/udoo
sha256:e3229a376acce736815faf5612c364f7e07d2fe2cbf54515d0e0e5d40c5455e9
=> 앞서 수정한 사항을 저장하도록 한다.
$ cd ~/IoT/UDOO/images/mine
$ tar xvzf ./mydroid.tar.gz
=> guest OS로 부터 전달받은 mydroid.tar.gz file의 압축을 푼다.
$ cd mydroid
$ sudo -E ./make_sd.sh /dev/sdb
=> PC에 삽입한 microSD card의 장치명이 /dev/sdb라고 하자.
=> make_sd.sh 파일은 udoo.org에서 제공하는 파일로, microSD card에 android image를 설치(파티션 생성 및 file system을 만들어 줌)하는 역할을 담당한다.
Trying to unmount partitions
#############################################################################
## ##
## Going to format /dev/sdb device. Everything on this device will be lost ##
## ##
## Android Distro will be grabbed from: ##
## ./ ##
## ##
#############################################################################
Current partition table on /dev/sdb:
Disk /dev/sdb: 14.9 GiB, 15931539456 bytes, 31116288 sectors
Units: sectors of 1 * 512 = 512 bytes
Sector size (logical/physical): 512 bytes / 512 bytes
I/O size (minimum/optimal): 512 bytes / 512 bytes
Disklabel type: dos
Disk identifier: 0xa4bb2440
Device Boot Start End Sectors Size Id Type
/dev/sdb1 2048 34815 32768 16M 83 Linux
/dev/sdb2 36864 69631 32768 16M 84 OS/2 hidden or Intel hibernation
/dev/sdb3 69632 4304895 4235264 2G 5 Extended
/dev/sdb4 4304896 7088127 2783232 1.3G 83 Linux
/dev/sdb5 71680 3143679 3072000 1.5G 83 Linux
/dev/sdb6 3145728 4194303 1048576 512M 83 Linux
/dev/sdb7 4196352 4212735 16384 8M 83 Linux
/dev/sdb8 4214784 4227071 12288 6M 83 Linux
/dev/sdb9 4229120 4233215 4096 2M 83 Linux
Partition table entries are not in disk order.
Continue with formatting ? (y/N)y
Create android partition...
1+0 records in
1+0 records out
1024 bytes (1.0 kB, 1.0 KiB) copied, 0.00380178 s, 269 kB/s
Checking that no-one is using this disk right now ... OK
Disk /dev/sdb: 14.9 GiB, 15931539456 bytes, 31116288 sectors
Units: sectors of 1 * 512 = 512 bytes
Sector size (logical/physical): 512 bytes / 512 bytes
I/O size (minimum/optimal): 512 bytes / 512 bytes
>>> Created a new DOS disklabel with disk identifier 0x316eae91.
Created a new partition 1 of type 'Linux' and of size 16 MiB.
/dev/sdb2: Created a new partition 2 of type 'Linux' and of size 16 MiB.
/dev/sdb3: Created a new partition 3 of type 'Extended' and of size 2 GiB.
/dev/sdb4: Created a new partition 4 of type 'Linux' and of size 12.7 GiB.
/dev/sdb5: Created a new partition 5 of type 'Linux' and of size 1.5 GiB.
/dev/sdb6: Created a new partition 6 of type 'Linux' and of size 512 MiB.
/dev/sdb7: Created a new partition 7 of type 'Linux' and of size 8 MiB.
/dev/sdb8: Created a new partition 8 of type 'Linux' and of size 8 MiB.
/dev/sdb9:
New situation:
Device Boot Start End Sectors Size Id Type
/dev/sdb1 32768 65535 32768 16M 83 Linux
/dev/sdb2 65536 98303 32768 16M 83 Linux
/dev/sdb3 98304 4333567 4235264 2G 5 Extended
/dev/sdb4 4333568 31033343 26699776 12.7G 83 Linux
/dev/sdb5 98305 3170304 3072000 1.5G 83 Linux
/dev/sdb6 3173305 4221880 1048576 512M 83 Linux
/dev/sdb7 4224881 4241264 16384 8M 83 Linux
/dev/sdb8 4244265 4260648 16384 8M 83 Linux
Partition table entries are not in disk order.
The partition table has been altered.
Calling ioctl() to re-read partition table.
Syncing disks.
Formatting partitions...
mke2fs 1.42.13 (17-May-2015)
Creating filesystem with 3337472 4k blocks and 835584 inodes
Filesystem UUID: b85105a0-5792-4dcc-86bd-679e6fd5886d
Superblock backups stored on blocks:
32768, 98304, 163840, 229376, 294912, 819200, 884736, 1605632, 2654208
Allocating group tables: done
Writing inode tables: done
Creating journal (32768 blocks): done
Writing superblocks and filesystem accounting information: done
mke2fs 1.42.13 (17-May-2015)
Creating filesystem with 384000 4k blocks and 96000 inodes
Filesystem UUID: 29ac28e7-496b-40a7-bf14-5c50d356b205
Superblock backups stored on blocks:
32768, 98304, 163840, 229376, 294912
Allocating group tables: done
Writing inode tables: done
Creating journal (8192 blocks): done
Writing superblocks and filesystem accounting information: done
mke2fs 1.42.13 (17-May-2015)
Creating filesystem with 131072 4k blocks and 32768 inodes
Filesystem UUID: 89b253fc-c096-437e-b70f-9886680aae4c
Superblock backups stored on blocks:
32768, 98304
Allocating group tables: done
Writing inode tables: done
Creating journal (4096 blocks): done
Writing superblocks and filesystem accounting information: done
mke2fs 1.42.13 (17-May-2015)
Creating filesystem with 8192 1k blocks and 2048 inodes
Allocating group tables: done
Writing inode tables: done
Creating journal (1024 blocks): done
Writing superblocks and filesystem accounting information: done
Flashing android images...
324+1 records in
324+1 records out
332440 bytes (332 kB, 325 KiB) copied, 0.0898845 s, 3.7 MB/s
16+0 records in
16+0 records out
8192 bytes (8.2 kB, 8.0 KiB) copied, 0.00372499 s, 2.2 MB/s
813+1 records in
813+1 records out
6665511 bytes (6.7 MB, 6.4 MiB) copied, 1.44978 s, 4.6 MB/s
1270+1 records in
1270+1 records out
10411308 bytes (10 MB, 9.9 MiB) copied, 3.72556 s, 2.8 MB/s
74+1 records in
74+1 records out
1258217472 bytes (1.3 GB, 1.2 GiB) copied, 266.392 s, 4.7 MB/s
e2fsck 1.42.13 (17-May-2015)
Pass 1: Checking inodes, blocks, and sizes
Pass 2: Checking directory structure
Pass 3: Checking directory connectivity
Pass 4: Checking reference counts
Pass 5: Checking group summary information
system: 2129/76320 files (0.0% non-contiguous), 124740/304772 blocks
resize2fs 1.42.13 (17-May-2015)
Resizing the filesystem on /dev/sdb5 to 384000 (4k) blocks.
The filesystem on /dev/sdb5 is now 384000 (4k) blocks long.
324+1 records in
324+1 records out
332440 bytes (332 kB, 325 KiB) copied, 0.142313 s, 2.3 MB/s
uSD for Android 6.0.1 for: -> <- created.
--------------------------------------------------------------------------------------------------
정상적으로 image writing이 완료되었다면, microSD 카드를 다시 target 보드에 삽입한 후, 전원을 인가하도록 하자.

그림 5.6 Android 부팅 화면 1

그림 5.7 Android 부팅 화면 2

그림 5.8 Android 부팅 화면 1

그림 5.9 Android 부팅 화면 2 - 메인 메뉴
아래 그림은 adb shell로 target board에 접속한 모습을 보여준다.

그림 5.10 adb shell 명령 실행 모습
여기서 잠깐 ! fastboot 사용하기
Fastboot를 사용하여 booting을 시도하거나, flash 파티션 별로 이미지를 설치하는방법과 관련하여 간략히 확인하고 넘어가기로 하자.
<Host PC>
$ sudo adb devices
=> target board가 USB를 통해 연결되어 있는지를 확인한다.
List of devices attached
0f14c9d4e3167ab8 device
$ sudo adb reboot-bootloader
=> target board를 fastboot mode로 전환시킨다.
=> 이 명령을 사용하는 대신 u-boot mode(콘솔)에서 fastboot 명령을 실행해도 된다.
<Target board>
U-Boot SPL 2015.04-gb80fafc-dirty (Feb 10 2017 - 05:31:03)
Setting 1024MB RAM calibration data
port 1
SPL: u-boot second stage will be loaded from MMC0
U-Boot 2015.04-gb80fafc-dirty (Feb 10 2017 - 05:31:03)
CPU: Freescale i.MX6SX rev1.2 at 792 MHz
CPU: Temperature 52 C
Reset cause: WDOG
Board: UDOO Neo Full
I2C: ready
DRAM: 1 GiB
PMIC: PFUZE3000 DEV_ID=0x30 REV_ID=0x11
MMC: FSL_SDHC: 0, FSL_SDHC: 1
*** Warning - bad CRC, using default environment
In: serial
Out: serial
Err: serial
check_and_clean: reg 100, flag_set 0
Fastboot: Normal
flash target is MMC:0
Net: using phy at 0
FEC0 [PRIME]
<= fastboot mode로 전환됨.
<Host PC>
$ sudo fastboot devices=> target board가 fastboot mode로 전환되었는지를 확인한다.
2530206283809901240 fastboot
$ sudo fastboot boot ./boot.img
=> boot.img 파일을 USB를 통해 내려 받아 부팅을 시도한다.
=> 테스트해 본 결과, 불행히도 이 기능은 정상 동작하지 않았다.
downloading 'boot.img'...
OKAY [ 0.312s]
booting...
OKAY [ 0.004s]
finished. total time: 0.315s
<Host PC>
$ sudo fastboot devices=> target board가 fastboot mode로 전환되었는지를 확인한다.
2530206283809901240 fastboot
$ sudo fastboot flash ./boot.img
=> boot partition의 내용을 boot.img 파일로 교체한다.
target reported max download size of 419430400 bytes
sending 'boot' (6509 KB)...
OKAY [ 0.286s]
writing 'boot'...
OKAY [ 1.462s]
finished. total time: 1.748s
<Target board>
U-Boot 2015.04-gb80fafc-dirty (Feb 10 2017 - 05:31:03)
CPU: Freescale i.MX6SX rev1.2 at 792 MHz
CPU: Temperature 57 C
Reset cause: POR
Board: UDOO Neo Full
I2C: ready
DRAM: 1 GiB
PMIC: PFUZE3000 DEV_ID=0x30 REV_ID=0x11
MMC: FSL_SDHC: 0, FSL_SDHC: 1
*** Warning - bad CRC, using default environment
In: serial
Out: serial
Err: serial
check_and_clean: reg 0, flag_set 0
Fastboot: Normal
flash target is MMC:0
Net: using phy at 0
FEC0 [PRIME]
Normal Boot
Hit any key to stop autoboot: 0
=> fastboot
Starting download of 6665511 bytes
..................................................
downloading of 6665511 bytes finished
writing to partition 'boot'
Initializing 'boot'
switch to partitions #0, OK
mmc0 is current device
Writing 'boot'
MMC write: dev # 0, block # 32768, count 13019 ... 13019 blocks written: OK
Writing 'boot' DONE!
<= fastboot 명령으로 boot partition 내용이 교체됨. reset 버튼을 눌러 target board 재부팅함.
----------------------------------------------------------------------------------------------------------------------------//
마지막으로 아래 그림은 Android Studio를 통해 android app을 build하고, adb로 target board에 설치한 후 실행하는 예를 보여준다.
<Host PC>
$ adb devices
List of devices attached
0f14c9d4e3167ab8 device
emulator-5554 device
$ adb -s 0f14c9d4e3167ab8 install ./app-debug.apk
4364 KB/s (324222 bytes in 0.072s)
pkg: /data/local/tmp/app-debug.apk
Success

그림 5.11 android app을 실행한 모습[참고 문헌 9 참조]
(간단한 내용이기는 하지만)이상으로 UDOO Neo 보드에 docker 환경을 통해 build한 android marshmallow image를 돌려 보는 전 과정을 간략히 살펴 보았다. 다음 시간에는 UDOO Neo 보드의 특징을 좀 더 구체적으로 분석하는 시간을 가져 보도록 하겠다.
<TODO>
- schematic 분석
- device tree 분석 & external pin 설정 관련
- u-boot, kernel 주요 코드 분석
- arduino(cortex-m4) 파트 관련 설정 테스트
- android nougat porting(시간이 허락한다면)
References
1. http://www.udoo.org/docs-neo/Advanced_Topics/Compile_Android_From_Source.html
2. https://www.digitalocean.com/community/tutorials/how-to-install-and-use-docker-on-ubuntu-16-04
3. https://docs.docker.com/engine/installation/linux/ubuntu/
4. http://blog.nacyot.com/articles/2014-01-27-easy-deploy-with-docker/
5. Docker Up & Running, Karl Matthias & Sean P.Kane, O'Reilly.
6. https://source.android.com/source/downloading.html
7. Embedded Android, Karim Yaghmour, O'Reilly.
8. http://elinux.org/UDOO_Installing_Debian_With_Debootstrap
9. 실전 앱 프로젝트 - 안드로이드 게임 개발편, 박승제, JPub.
Slowboot